Squirrel Chili

IMG_1612


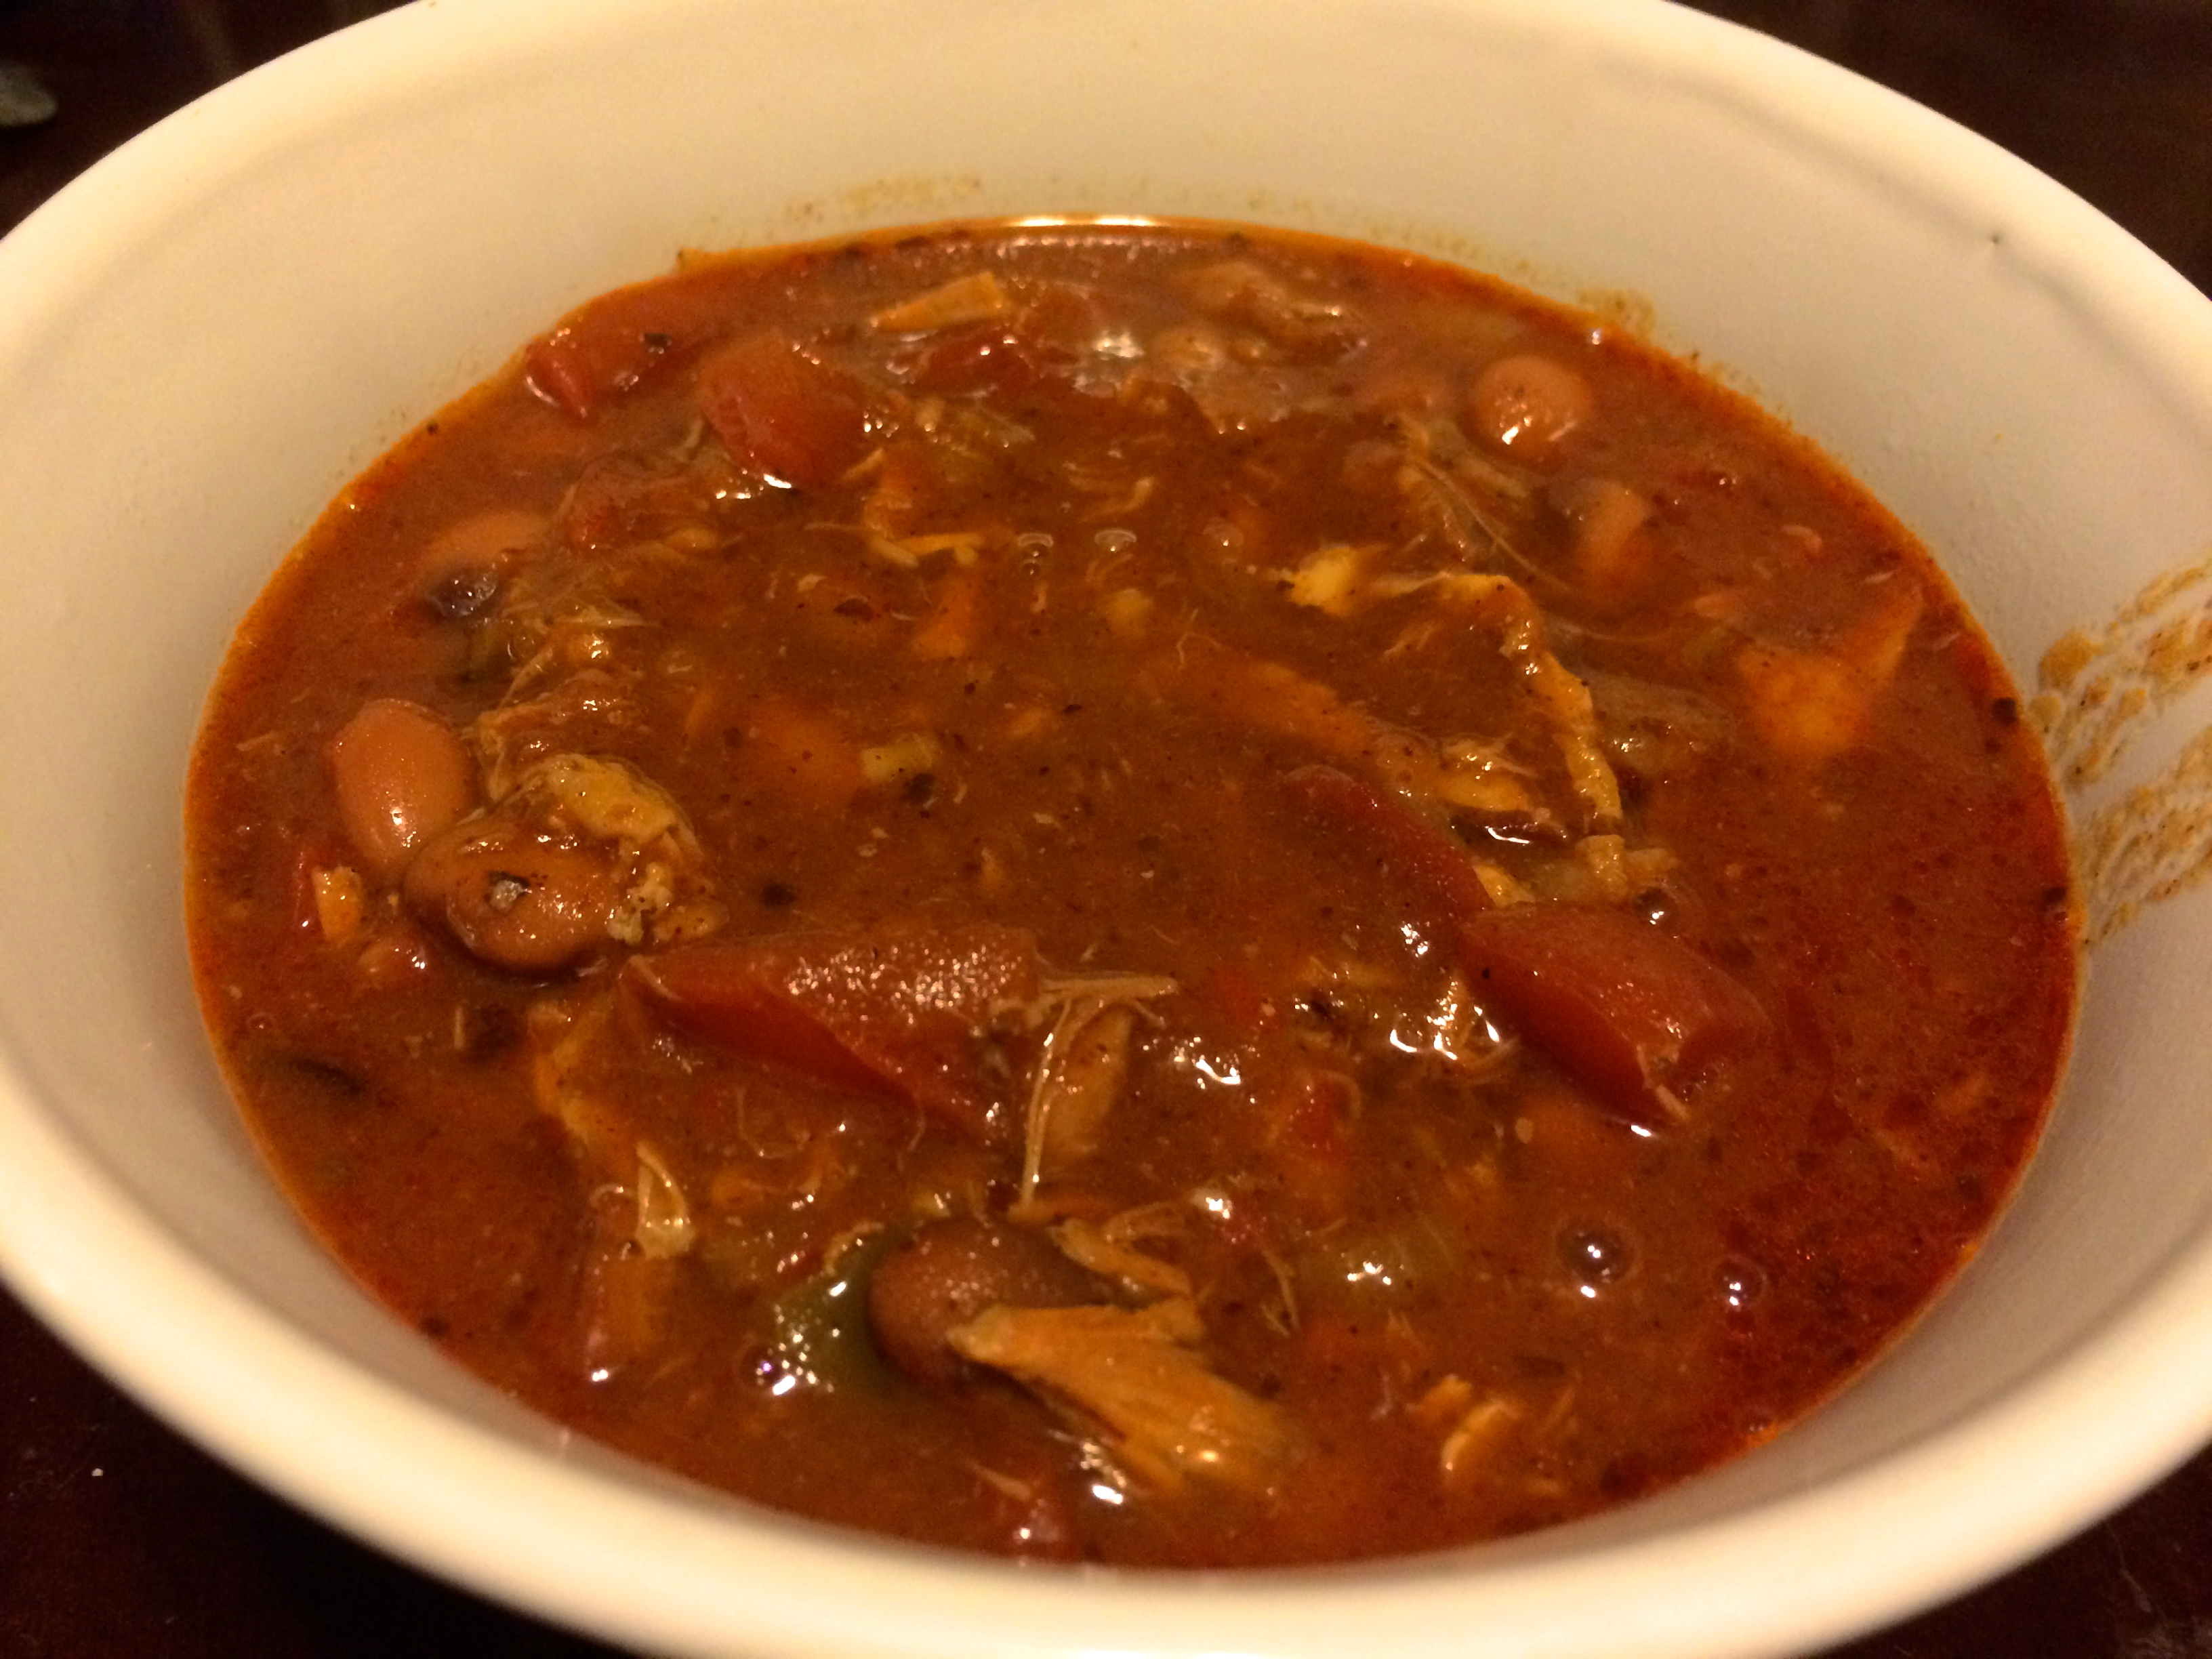
Who doesn’t love chili this time of year? It is the perfect food to come home to from October to March. At least in the mid-west this is true. Not many people want to eat a hot, steaming bowl of chili in July or August, but once the temperature changes, the menu changes. Chili is one of those items on the menu in my household this time of year. My guy, who happens to be a hunter, shot a squirrel in our yard with his bow. Since it was only one squirrel, I decided to make a squirrel & chicken chili. Simple, but delicious.

Squirrel Chili (serves 2)

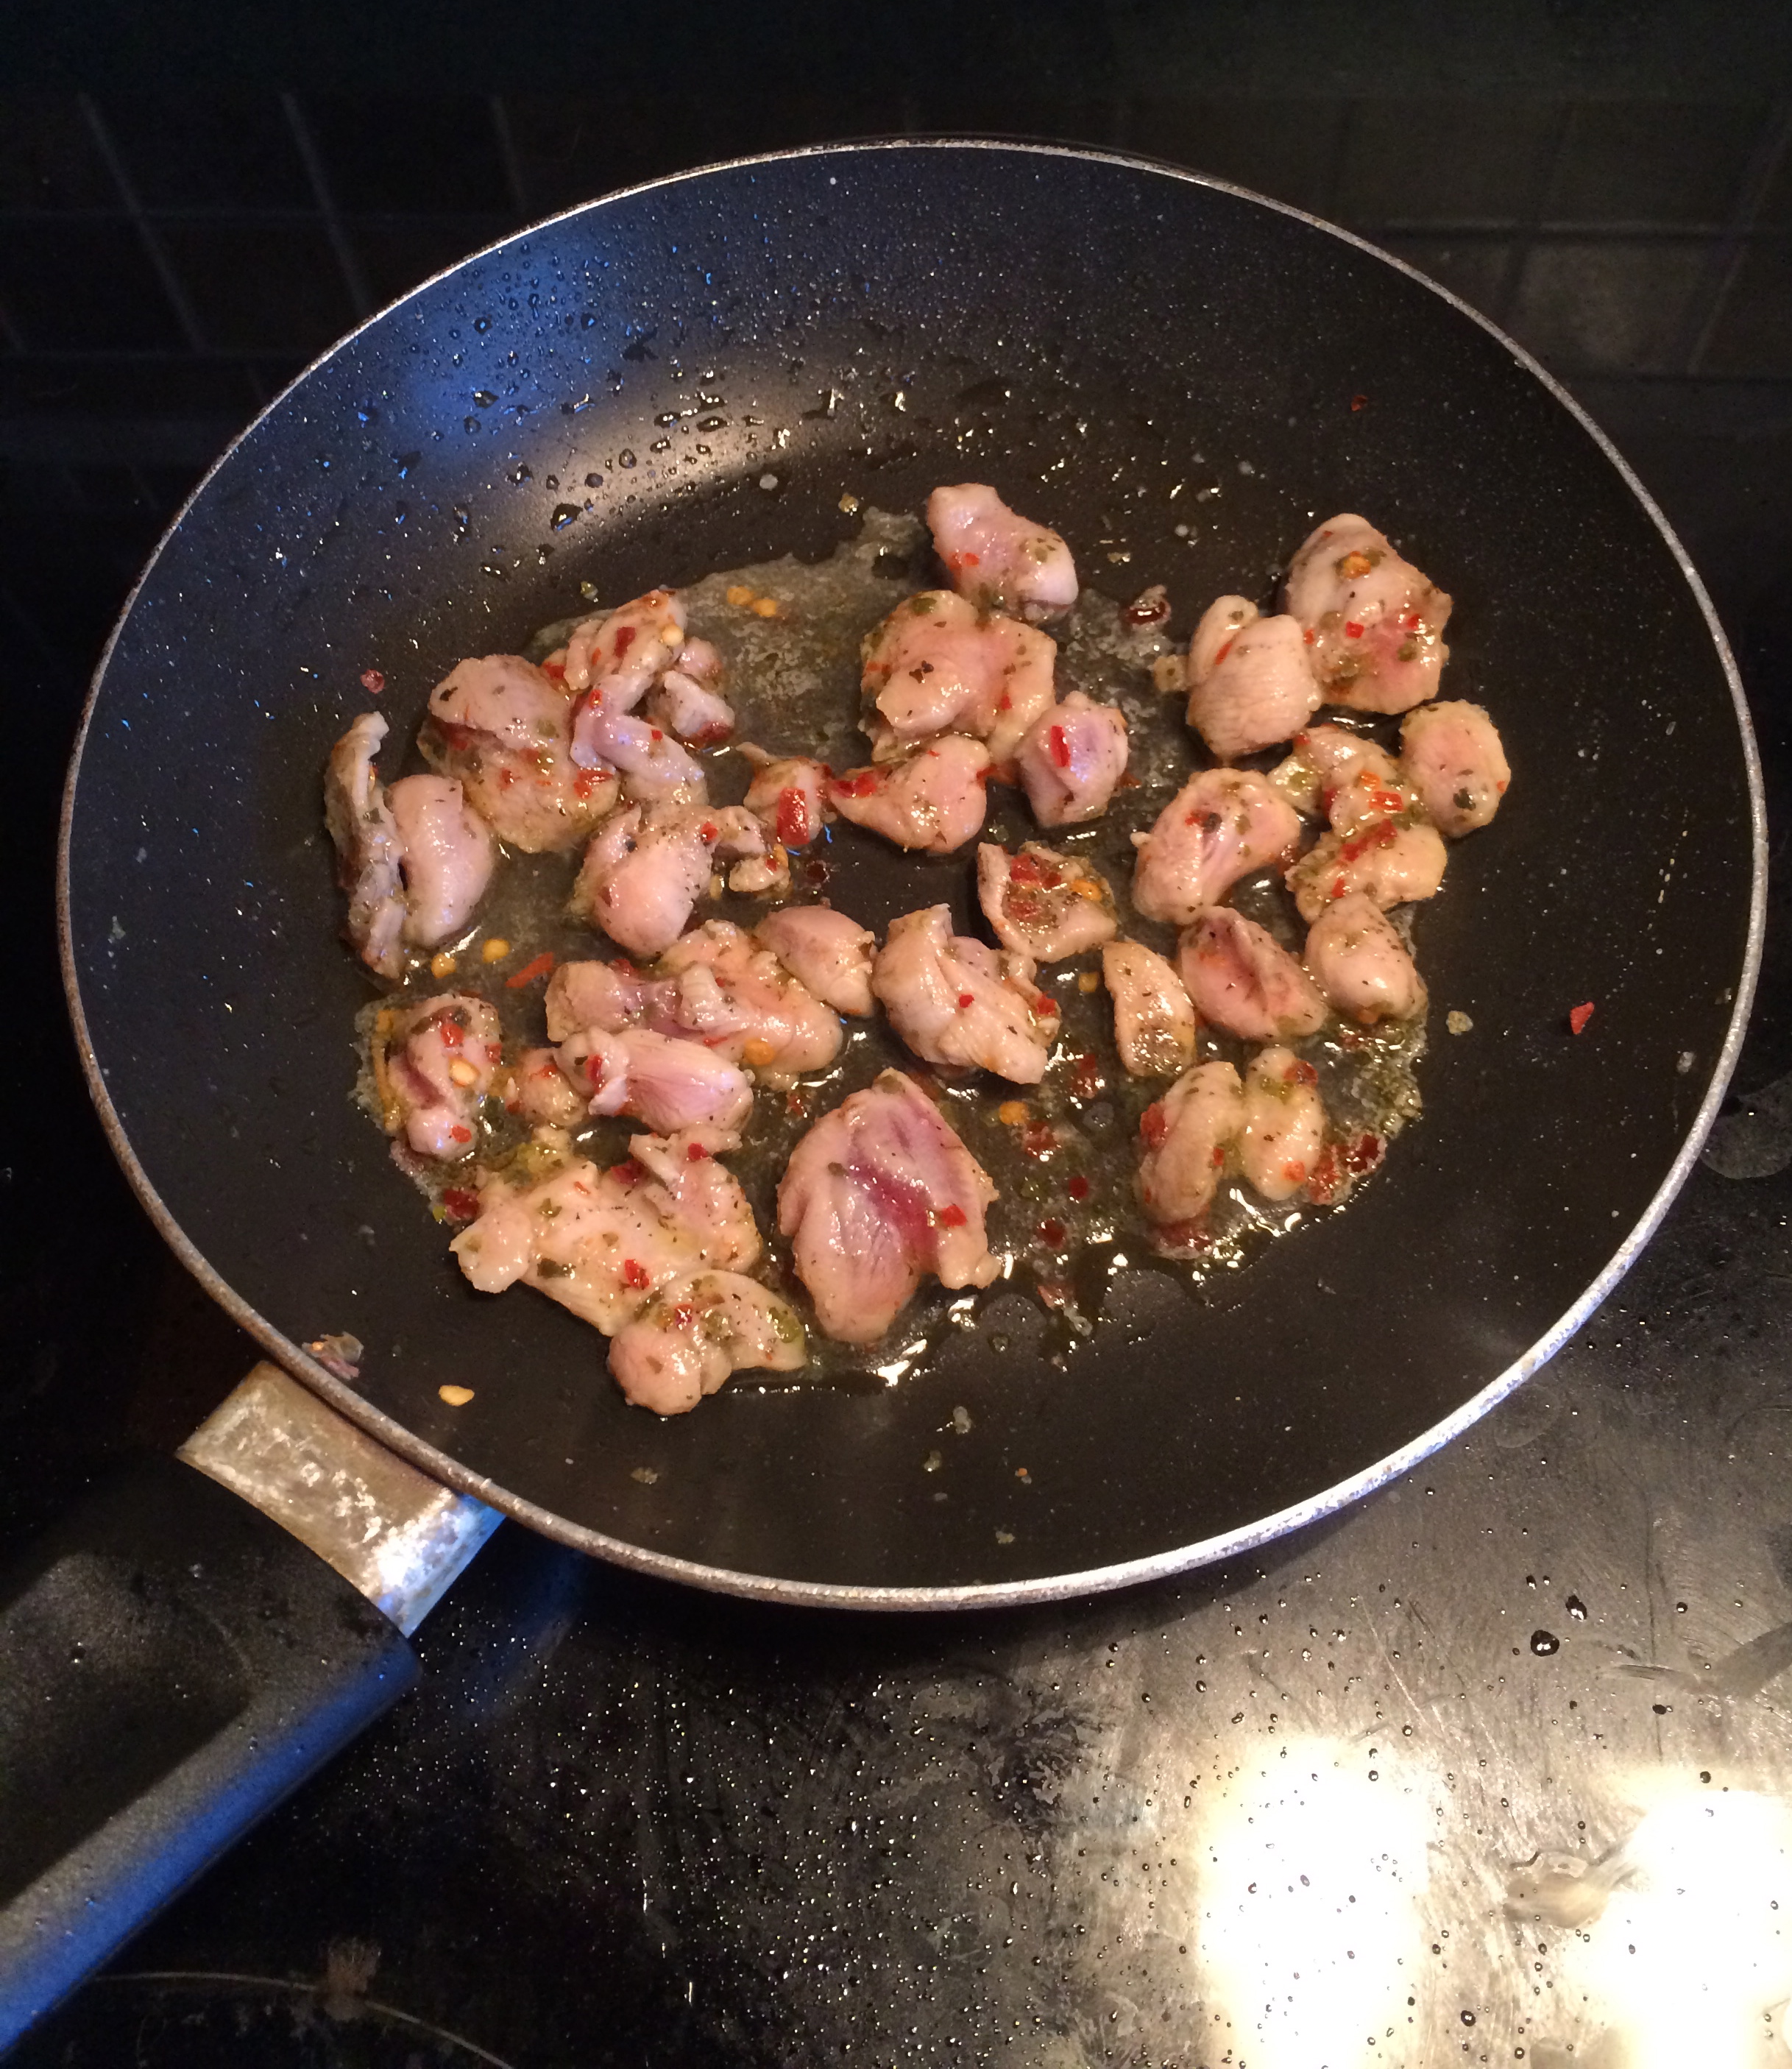
  • 1 squirrel, skinned, cleaned, & cut into bite-size pieces ( brined for 2-4 hrs)
    • Brine Ingredients (4 cups water, 1/4 cup salt, 1-2 tbsp sugar, dash or two each chili flakes, oregano, & pepper)
  • 1 cup cooked chicken, shredded or cubed (if you have 2 squirrels you can omit the chicken)
  • 2 pieces cooked bacon, crumbled
  • 2-3 tomatoes diced
  • 1 onion, chopped
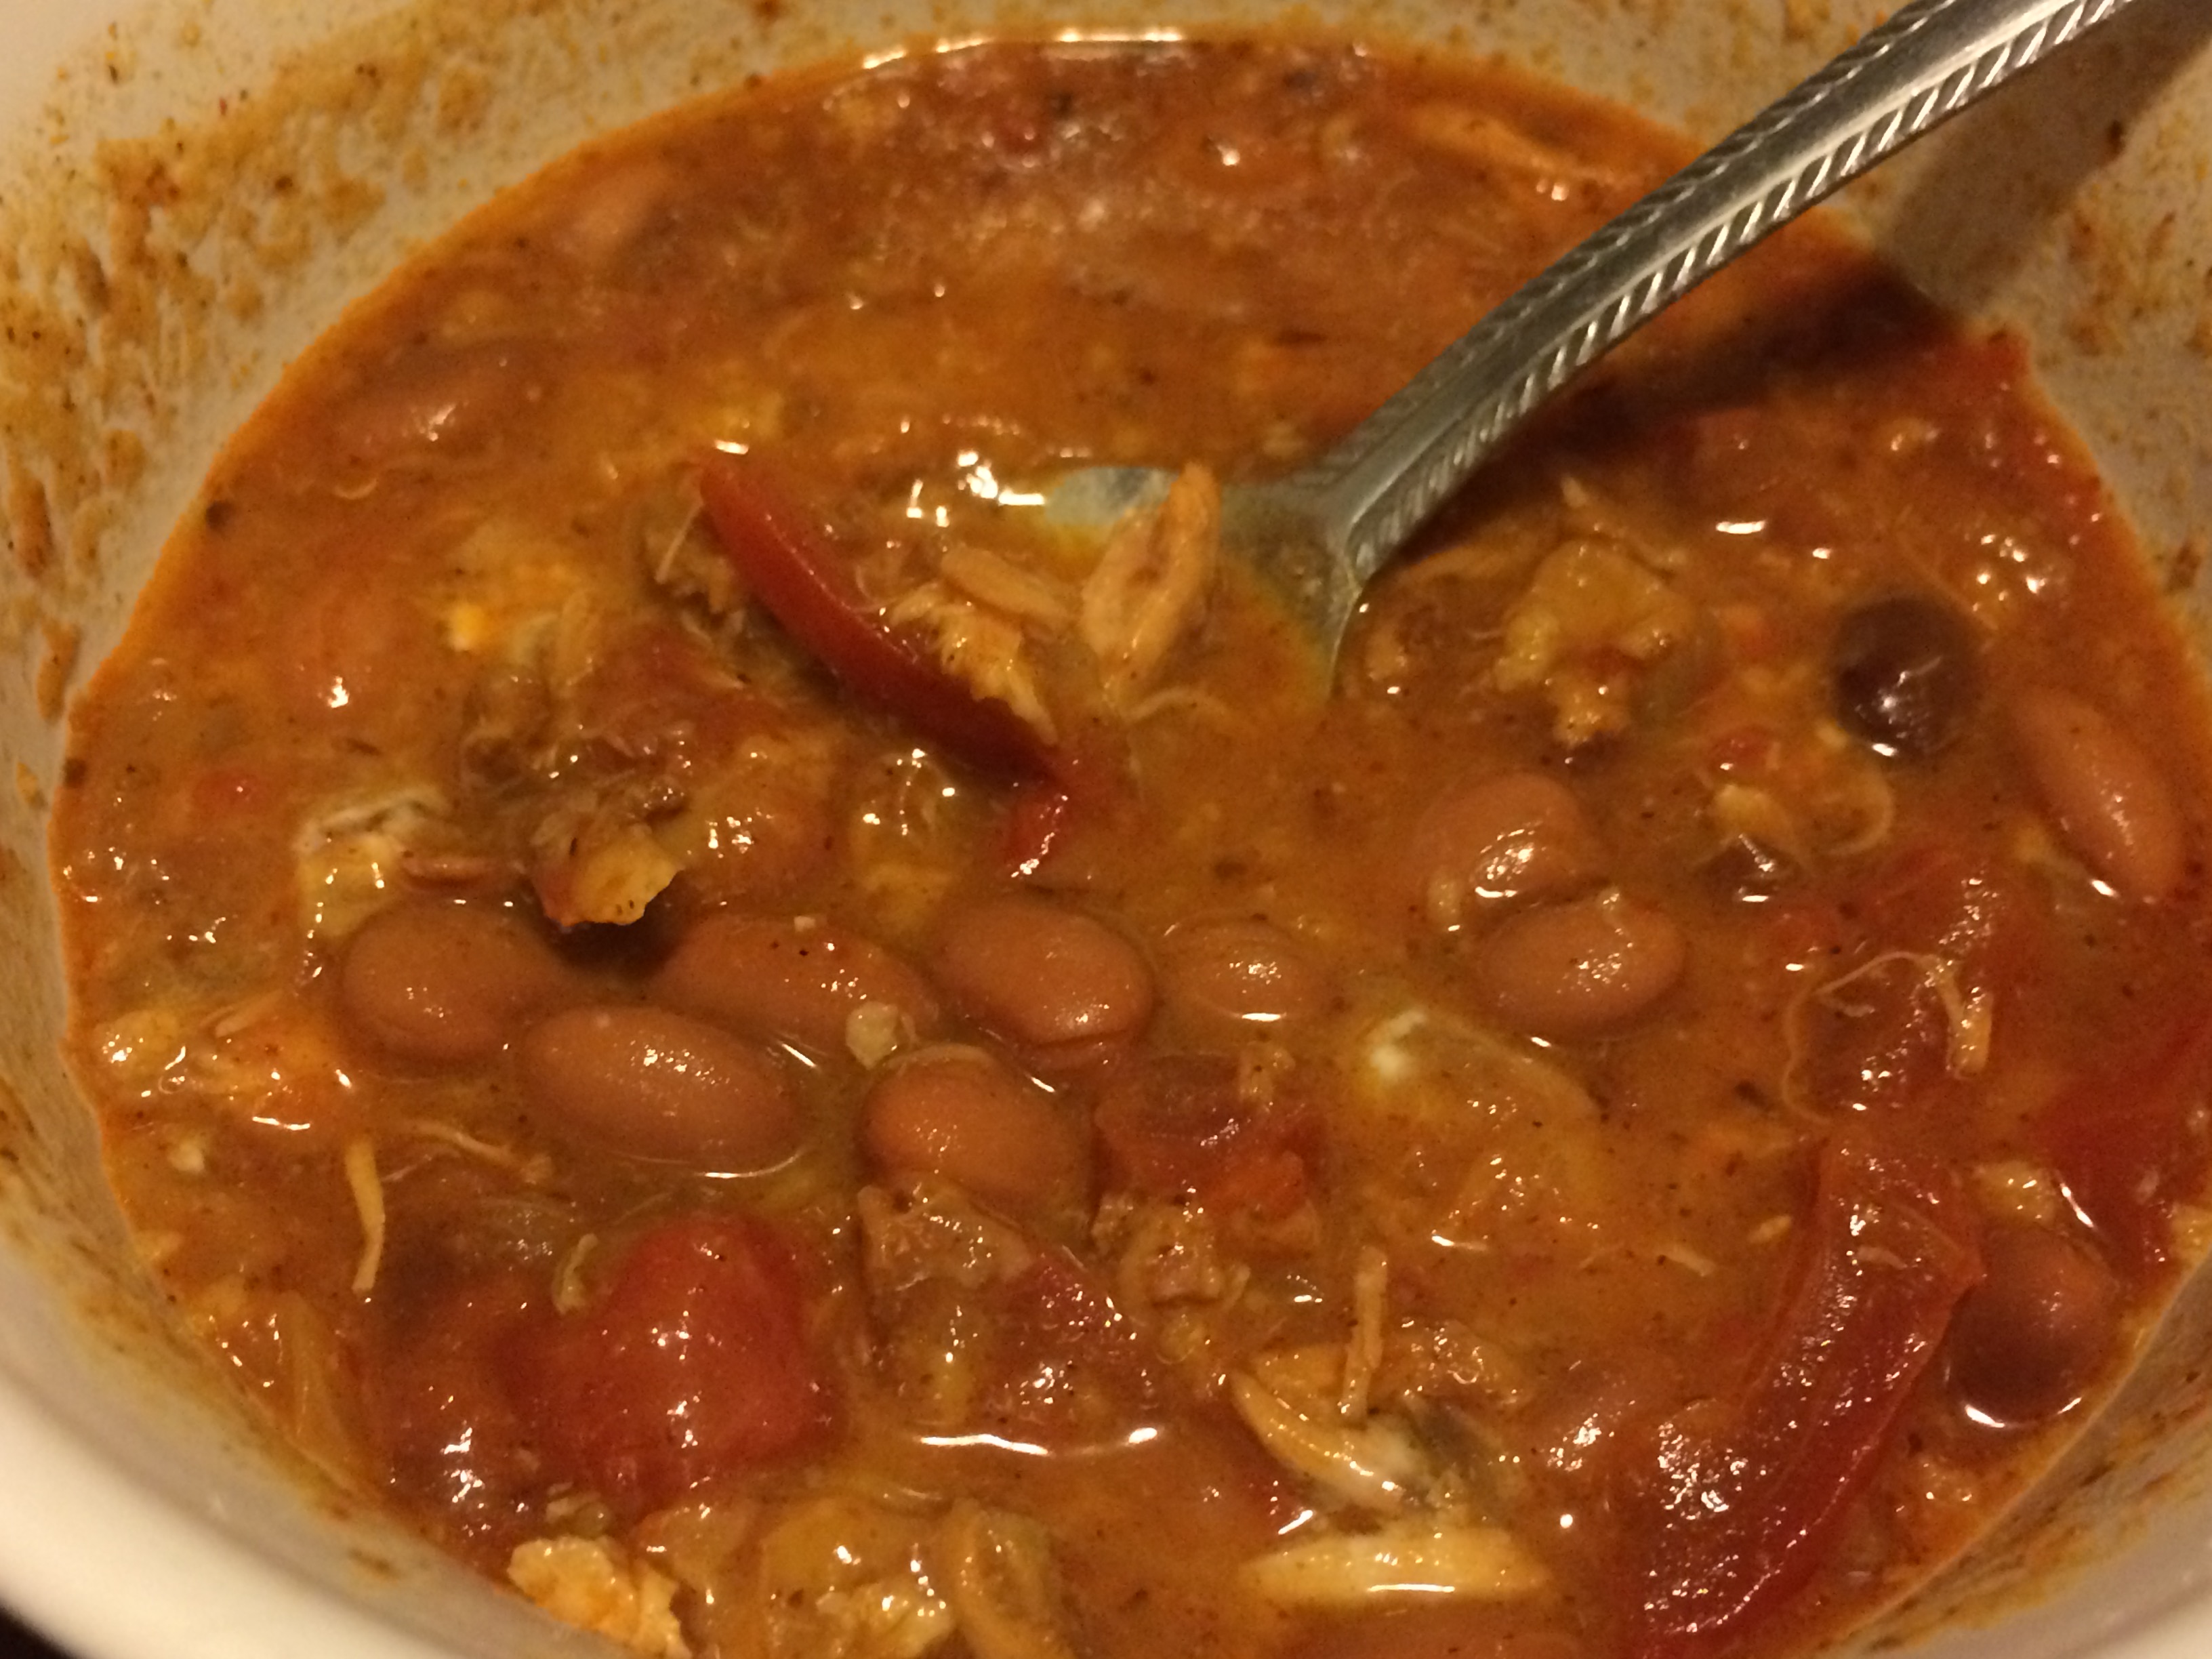
  • 1 can chili beans, undrained
  • 1/2 cup chunky salsa
  • chili seasoning (1-2 tsp store bought or your favorite blend. I used a combo of chile powder, paprika, cumin, garlic & onion powder, salt & pepper, oregano, & cayenne).
  • olive oil (to coat two skillets)

Combine the brining ingredients in a medium bowl. Add the squirrel & keep in the fridge for 2-4 hrs. Once brined, drain the squirrel but do not rinse. In a small skillet heat a small amount of olive oil over medium high heat. Brown the squirrel and place in a crockpot

IMG_1610

Saute a chopped onion in another skillet for 5-10 minutes until softened. Add this to the crockpot with all the other ingredients. Stir to combine. Heat on low for 6-8 hrs (this can also be made on the stove in a heavy duty pot or dutch oven on simmer for 2-4hrs). Serve with cheddar cheese & sour cream if desired.

IMG_1613


Pumpkin Bacon Mac & Cheese

The season of pumpkin has arrived!! The changing & falling of leaves, brisk fresh air, the list goes on. I am one of those people that loves pumpkin. Pumpkin everything. I cannot help it & nor do I want to. It is delicious. I do eat it year round thanks to the canned goods but I really go crazy in the fall & early winter.

I love it in sweets but do enjoy the savory side of it as well. This is a savory dish & it’s also a souped up Mac & Cheese dish. Mac & Cheese has never been a favorite of mine. I ate the blue box stuff as a kid but didn’t love it. I didn’t realize I liked mac & cheese until I had homemade versions.

This one is the perfect way to start the pumpkin season. The combination of pumpkin, bacon, & cheese is delicious, satisfying, & comforting. Which are all the things I want on a brisk fall day. With the extra canned pumpkin I made Pumpkin Cookies


Pumpkin Bacon Mac & Cheese (serves 2)

  • 1 cup elbow macaroni
  • 4 slices bacon
  • 2 tbsp butter
  • 2 tbsp flour
  • 2 cups milk
  • 1/2 cup canned pumpkin
  • salt & pepper to taste
  • 1/2 tsp each sage & thyme
  • few dashes garlic powder & cayenne
  • 1/2 cup cheddar cheese
  • 1/4 cup fine bread crumbs
  • 1/4 cup parmesan cheese
  1. Cook the macaroni according to package directions. Drain & set aside.
  2. Meanwhile, in a skillet cook the bacon until crisp. Remove & crumble. Set aside.
  3. Drain off the bacon grease. Add the butter & stir until melted. Add the flour & stir until dissolved. Whisk in the milk & cook until thick & bubbly. Add the pumpkin, spices, and cheddar cheese. Stir until pumpkin is incorporated & the cheese is melted.
  4. Stir in the bacon crumbles and macaroni. Pour into two individual casserole dishes.
  5. In a small bowl combine the bread crumbs & parmesan. Sprinkle over the macaroni. Bake in a 400F oven for 25-30 minutes or until topping is golden & sauce is bubbly.

IMG_1252

Bacon & Spaghetti Squash Pasta

I’m not sure when it happened, but I now make dinner regularly without a recipe. To those of you who have done this for awhile or forever – congrats. I, however, have always followed recipes. Sure I might have changed the seasonings here or switched out some of the ingredients for items I had on hand, but in general, I followed the recipe.

I remember when I came up with my very first recipe on my own for baking, Random Cookie Recipe, I was so pleased. Now it happens without me even realizing it. I throw together quick breads like Peach Bread where I only whipped it up to use leftover items from the peach muffins I made. It turned out the bread was a million times better than the muffins anyhow. I now look into my fridge & pantry to see what needs to be eaten & make up dishes without even thinking about it.

Last night I wanted to use the last of my bacon. I had 4 slices & thought I would add it to pasta. I decided I would use the bacon grease to make a sauce so that there would be bacon tidbits & flavor throughout the whole thing. I also had a spaghetti squash that had been sitting in the pantry for a bit as well. This is how Bacon & Spaghetti Squash Pasta was created. So good on so many levels.

Bacon & Spaghetti Squash Pasta

  • 4 slices bacon
  • 1 spaghetti Squash
  • 4oz spaghetti noodles
  • 1 tbsp. butter
  • 2 cloves garlic, minced
  • 1 tbsp. flour
  • 1 cup milk
  • few dashes nutmeg
  • few dashes cayenne
  • 2 tsp. brown sugar
  • oil for coating squash
  1. Preheat the oven to 375F.
  2. Cut the squash in half & coat all sides with olive oil. Bake for 1-1.25hrs cut side down until softened & tender. Shred the spaghetti squash into strands & set aside.
  3. In a large skillet, pan fry bacon over medium to medium-high heat & remove to a paper towel lined plate to drain when crispy. Reserve grease.
  4. Meanwhile, bring a large pot of salted water to a boil. Add pasta & cook according to directions. Drain pasta & return to pot. Reserve some of the cooking water.
  5. To the bacon grease, add the butter & then the garlic cloves. Sauté for 2minutes. Add the flour & stir until combined. Add the milk while whisking. Add the seasonings. Whisk continuously over medium-low to medium heat until thickened & bubbly.
  6. To the pot of drained pasta, add the squash & the sauce. Add the cooking water as needed to adjust the consistency of the sauce.
  7. Serve on two plates. Crumble the bacon & sprinkle on top. Sadly there are no pictures as it was eaten right away.


Breakfast Lasagna

On the weekends, particularly Sunday, I like to have something different for breakfast if possible. Considering all I had was bacon & eggs, I decided I would just make pancakes to go along with that. Nothing special. As I was gathering all my supplies, I thought…why not make it more fun and turn it into Breakfast Lasagna. The pancakes can be the noodles, the bacon & eggs could be the meat, I have cheese, and couldn’t the syrup become some sort of sauce? Yes. Yes. Yes. Thus, Breakfast Lasagna was made. The best part is that you can use whatever you have on hand & make it your own. Sausage, bacon, ham, none of the above? It doesn’t really matter. It’s whatever you feel like throwing together. Here is what I did…

Bacon

  1. Cook 4 slices bacon in a skillet over medium to medium high heat until crispy or preheat the oven to 400F and bake on a foil lined baking sheet for 15-20minutes until crispy. (I always bake my bacon as it turns out more even & is out of the way while I prep other things).
  2. Set bacon on a paper towel lined plate & pour bacon grease into a small pot (if you baked your bacon) or keep in the skillet for later use.

Pancakes (use your own recipe or follow this one)

  • 1/2 cup all-purpose flour
  • 2 tsp sugar
  • 1/2 tsp baking powder
  • 1/8 tsp baking soda
  • 1/8 tsp salt
  • few dashes cinnamon
  • 1 egg white or the whole egg if you desire
  • 1/2 cup buttermilk or sour milk (or 1/2tbsp lemon juice and 1/2 cup milk that stood for 5 minutes)
  • 1/2tsp vanilla extract
  • butter or cooking oil for cooking the pancakes
  1. Combine all the dry ingredients in a medium bowl.
  2. Combine all the wet ingredients in a small bowl.
  3. Add the wet ingredients to the dry ingredients & stir until just combined.
  4. Preheat a skillet over medium heat. Add a small pat of butter to coat the skillet.
  5. Pour batter* into skillet and cook until pancakes are golden brown, turning to second side when they have turned bubbly & the edges are slightly dry. Cook the second side until pancakes are golden brown. Approx. 2min per side.

* Make whatever size pancakes will fit into a small casserole dish or oven safe container so you don’t have to tare them as much. I made oval pancakes.

Scrambled Eggs

  1. Whisk 4 eggs & a few tbsp milk together until smooth.
  2. Pour into a small greased skillet that has been heating over medium heat.
  3. Let sit until edges start to set – approx 1 minute. Using a wooden spoon or a spatula, scrape the sides of the eggs to create large curds. Continue in this manner until the eggs are cooked through. Set aside.

Maple Bechamel

  1. Place the skillet or small pot with reserved bacon grease over medium-low to medium heat.
  2. Add a small pat of butter & stir until almost melted. Add a tbsp flour and stir into bacon-butter mixture.
  3. Add approx. 1/2 cup maple syrup to this and mix constantly until thickened & bubbly. Set aside.

Assembly

IMG_1051

  1. Preheat the oven to 400F if you did not bake your bacon. If you did, keep the oven set at this temperature.
  2. Take a small casserole dish or oven safe container and grease the bottom & sides.
  3. Place a layer of pancakes (approx half the pancakes) on the bottom.
  4. Coat the pancakes with half of the béchamel sauce.
  5. Top with half the eggs.
  6. Crumble the bacon and place half on top. 
  7. Add a small amount (a few tbsp) of cheddar cheese over this.
    IMG_1053
  8. Repeat layers. (I had one pancake leftover so tore it into small pieces & placed it over the top).

IMG_1054

9. Cover with foil and bake for 10min. Remove the foil & bake for 5-10min more.

10. Cut into 2 pieces & serve with additional syrup if desired.

IMG_1058


Honey-Roasted Onion, Bacon, & Corn Tart

It has been awhile since I’ve gotten to bake on Sundays. Last Sunday, I decided that I would bake a tart as I recently bought a tart pan. I’ve been meaning to get one for years but never followed through with it until now. I have been dying to make tarts for a long time. Fruit tarts, cream tarts, and of course…savory tarts. I looked in my cookbooks & online for inspiration. I ended up finding many recipes I wanted to make but used one from Bon Appetite as a guideline.

Honey Roasted Onion, Bacon, & Corn Tart inspired from Honey-Roasted Onion Tart

For the pastry: Cornmeal Pate Brisee (make half the recipe)

After the dough has been refrigerated, roll the dough out on a lightly floured surface to be 13in round & about 1/4 in thick. Fit dough into a tart pan with a removable bottom pressing into the edges. Fit the dough flush to the edge of the pan. Chill for about 30 minutes.

Preheat the oven to 375F and line chilled shell with parchment paper with a bit of overhang on the edges. Fill with dried beans or pastry weights. Bake for 30-40minutes & remove parchment & weights. Bake for 10-15 more minutes & cool completely on a wire rack.

For the filling:

  • 5 slices bacon
  • 1-1.5lb (2 large) sweet yellow onions, sliced in 1/4in half moons
  • ¼ cup honey
  • ¼ cup white cooking wine
  • ½ cup yogurt
  • ¼ cup milk
  • 2 pinches salt
  • thyme to taste (1/4-3/4 tsp)
  • 1 can corn

Preheat oven to 400F. Line a baking sheet with parchment paper. Place 5 slices bacon & bake for 15-20 minutes until crispy. Remove bacon, crumble, & set aside.

Place sliced onions on parchment paper with leftover bacon grease.

Combine honey & wine and pour over onions.

Roast onions for 45-60minutes until caramelized, stirring onions every 10-20minutes (stir more frequently at the end).

Place onions in tart shell. Mix yogurt, milk, salt, thyme, & corn and pour over onions.

Bake for 30-40minutes until almost set. Place crumbled bacon on top of tart & bake for another 10 minutes.

Remove from oven & cool slightly. Enjoy as an appetizer or for breakfast.


I didn’t have any pictures right out of the oven as it was gobbled up but I have one picture of some leftovers. Unfortunately it doesn’t do it justice.

onion tart