Honey-Roasted Onion, Bacon, & Corn Tart

It has been awhile since I’ve gotten to bake on Sundays. Last Sunday, I decided that I would bake a tart as I recently bought a tart pan. I’ve been meaning to get one for years but never followed through with it until now. I have been dying to make tarts for a long time. Fruit tarts, cream tarts, and of course…savory tarts. I looked in my cookbooks & online for inspiration. I ended up finding many recipes I wanted to make but used one from Bon Appetite as a guideline.

Honey Roasted Onion, Bacon, & Corn Tart inspired from Honey-Roasted Onion Tart

For the pastry: Cornmeal Pate Brisee (make half the recipe)

After the dough has been refrigerated, roll the dough out on a lightly floured surface to be 13in round & about 1/4 in thick. Fit dough into a tart pan with a removable bottom pressing into the edges. Fit the dough flush to the edge of the pan. Chill for about 30 minutes.

Preheat the oven to 375F and line chilled shell with parchment paper with a bit of overhang on the edges. Fill with dried beans or pastry weights. Bake for 30-40minutes & remove parchment & weights. Bake for 10-15 more minutes & cool completely on a wire rack.

For the filling:

  • 5 slices bacon
  • 1-1.5lb (2 large) sweet yellow onions, sliced in 1/4in half moons
  • ¼ cup honey
  • ¼ cup white cooking wine
  • ½ cup yogurt
  • ¼ cup milk
  • 2 pinches salt
  • thyme to taste (1/4-3/4 tsp)
  • 1 can corn

Preheat oven to 400F. Line a baking sheet with parchment paper. Place 5 slices bacon & bake for 15-20 minutes until crispy. Remove bacon, crumble, & set aside.

Place sliced onions on parchment paper with leftover bacon grease.

Combine honey & wine and pour over onions.

Roast onions for 45-60minutes until caramelized, stirring onions every 10-20minutes (stir more frequently at the end).

Place onions in tart shell. Mix yogurt, milk, salt, thyme, & corn and pour over onions.

Bake for 30-40minutes until almost set. Place crumbled bacon on top of tart & bake for another 10 minutes.

Remove from oven & cool slightly. Enjoy as an appetizer or for breakfast.


I didn’t have any pictures right out of the oven as it was gobbled up but I have one picture of some leftovers. Unfortunately it doesn’t do it justice.


onion tart


Peach Muffins & Peach Bread

It has been a long time since I have been able to bake. I moved up north and had temporary living arrangements where I did not have my kitchen or pantry items available to me for 2 months. I finally closed on my new home and have started the slow process of unpacking. The kitchen, however, was put together almost immediately.

My new kitchen has a wall oven. I have always wanted a wall oven. It’s so easy to put things in and take them out without ever having to bend over. I finally got to put it to good use these past few days. Baking Sunday occurred for the first time in a long time. For those of you who don’t know “Baking Sunday” is where I bake & do other things I enjoy while my other half watches football – a sport which I completely detest.

As I was looking through my cookbooks trying to figure out what to make, my sweetie saw a photo of fudgie brownies and said that it looked yummy. So I decided to make them. They turned out very dense and fudge-like as the name implied. I decided that the next day I would make muffins as I saw a recipe for “Muffin Monday” that looked yummy which called for canned apricots.

Seeing as how I have no can opener (it’s a long story) I needed something that had a tab on the lid or those fruit in syrup packs. I ended up buying peaches in syrup.

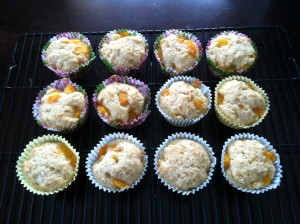
Peach Muffins adapted from Apricot Muffins

  • 1 3/4 cups flour
  • 1 /2 cup sugar
  • 2 tsp baking powder
  • 1/2 tsp salt
  • 1/4 cup vegetable oil
  • 1/4 cup milk
  • 1 (4) pack of diced peaches in syrup (4-4oz containers)
  • 1/4 cup syrup from the drained dice peaches
  • 1 tsp vanilla
  • 1 egg

Preheat the oven to 350F & line a muffin pan with liners. Drain the peaches but retain the syrup. Mix the first 4 ingredients together in a large bowl and mix the rest of the ingredients (except the diced peaches) in a medium bowl. Add the wet ingredients to the dry and mix until just combined. Fold in the diced peaches leaving 1/2 to 2/3 cup to use in another recipe. Bake for 25-30 minutes or until a toothpick comes out clean. Cool for 5 minutes on a wire rack. Remove muffins from pan and cool completely.

IMG_0917

As I had leftover peaches and syrup I decided to make a quick bread to use them up.

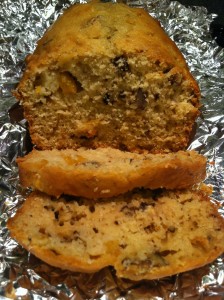
Peach Bread

  • 2 cups flour
  • 2/3 cup sugar
  • 1 tsp baking powder
  • 1/2 tsp baking soda
  • 1/2 tsp salt
  • 1/3 cup vegetable oil
  • 2 eggs
  • 1/2 cup fruit syrup
  • 1/2 cup milk
  • 1/2 cup to 2/3 cup diced peaches
  • 1/2 cup chopped walnuts

Preheat oven to 350F and grease a loaf pan with butter. Mix the first 5 ingredients in a large bowl. Mix the oil, eggs, syrup, & milk in a medium bowl. Add the wet ingredients to the dry and mix until just combined. Fold in the peaches and walnuts and pour into greased loaf pan. Bake for 50-60minutes or until a toothpick near the center comes out clean. Cool for 10 minutes in a wire rack and remove from pan to cool completely before slicing.

IMG_0921


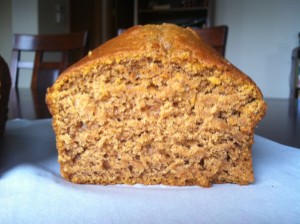
Both were delicious. The muffins had a light peach flavor throughout with bits of diced peaches, but they were a little dense and not as moist as they could have been. The bread also had peach flavor throughout and bits of diced peaches but was very moist. It had a great texture with the walnuts as well. Thus, the bread wins this battle.

Random Cookie Recipe

I have never been good at throwing stuff together for baking. I have always followed recipes exactly and then played around with them to perfect them, but I never make up my own recipes. I have always been jealous of those that can do this. I started baking after school in elementary school using my mother’s recipe box so perhaps I feel a sort of nostalgia for following recipes to the letter. Perhaps it is the chemist in me seeking perfection and knowing that many baked goods require precise measurements and timings. Whatever the reason, I do wish to surpass it at times. So this last Sunday I decided to go for it.

Since I have been making cookies of late, I decided to make a “junk in the trunk” or “monster” or “garbage” type cookie (choose your naming preference). I looked in my pantry of goodies and started grabbing. I know enough of the science behind baking (there is my nerdiness coming out) to know what proportions need to be used and how long and at what temperature items need to be baked at.

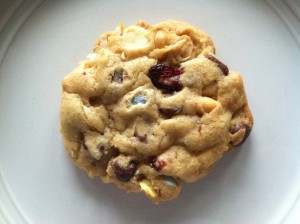
I ended up with something spectacular. It is sweet and salty, but mainly sweet because that is what I want in my cookies. It also has a great cookie flavor, if that makes any sense, in addition to all the junk that it is in. So although I do not know how much I will be inventing in the future, I consider this a solid start.

Random Cookie Recipe

1 3/4 C all-purpose flour

3/4 tsp baking soda

1/2 C (1 stick) unsalted butter, room temperature

1/2 C packed brown sugar

1/2 C granulated sugar

3/4 tsp salt

1 egg

1 tsp vanilla

2/3 C chocolate chips (or bittersweet chocolate chopped, if you have it)

1/3 C white chocolate chips

1/3 C chocolate candy (I used cadbury mini eggs)

1/3 C roasted, salted peanuts

1/3 C coconut

1/3 C dried cranberries

In a large bowl beat the butter until smooth. Add both sugars and the salt and beat until combined, scraping down the sides of the bowl as needed.

Add the egg and vanilla and beat until just combined. Add the flour and the baking soda and beat until just combined, scraping the bowl as needed.

Add everything else and stir until combined. You may have to use your hands in a meatloaf style fashion of mixing to get it all incorporated. There is a lot going on with this cookie, do not panic.

Shape the dough into 3tbsp balls and place them on a baking sheet lined with parchment paper about 2in apart. Cover with plastic and chill for 1hr (no more than 24 hours).

Remove the plastic and place in the middle of the oven preheated to 350F. Use your hand or a cup and flatten each cookie slightly (to be approximately 1cm high).

Bake the cookies for about 12 minutes or until light golden brown*. Transfer immediately to wire racks and let cool (at least slightly) before consuming.

*Please note that these cookies set rapidly. They will be a light golden brown but may still be soft to the touch when removing from the oven. Upon transfer to the wire racks you will see them set almost instantly.

IMG_0739


Football Sunday or rather Baking Sunday

If you know me at all than you know I am not fond of sports. I find them boring. I do like hockey, but not for such a long season. I only like it in small quantities. I also like going to baseball games but that really only consists of one game a year. The game I cannot stand though, which America loves, is football. This game drives me crazy. It is so dreadfully boring that I want to tear my hair out. I have never liked it as a child and nothing has changed as I got older. Most people like this game and that includes my other half.

He likes Football Sunday. I tried to watch a game once but ended up being super annoying by talking throughout it and complaining the whole time. It was at this point that I decided that I would use Football Sunday to make food or bake or whatever I felt like doing project wise. It is a win-win situation now for the both of us.

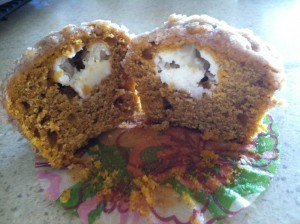
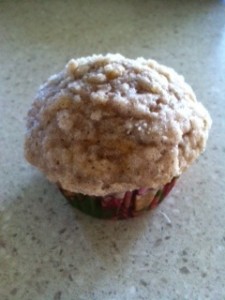
Last Sunday was the first time that I got a chance to get my bake on. I was in the kitchen for about 5 hours. It was amazing. I made two different kinds of Oatmeal Raisin Cookies (which I just previously posted in my Battles of Baked Goods). I also made Pumpkin Cream Cheese Muffins and some cute halloween treats.

IMG_0706

IMG_0715 photo-15


IMG_0698


So even though I cannot stand football, it does give me some time to spend in the kitchen doing the things that I love. Baking. Relaxing. Thinking. Being in the kitchen for me is sometimes like going to a Zen place. I cannot quite explain it.

Oatmeal Raisin Cookies

I often ask people what their favorite___________ is. This time I asked people at work about cookies. One person said Oatmeal Raisin to which I gave a slight look of horror. “Not oatmeal chocolate chip?” I asked. Nope. She wanted oatmeal raisin. Other people said different types of cookies but as I had an abundance of oats I decided to try two different oatmeal raisin cookie recipes.

IMG_0706

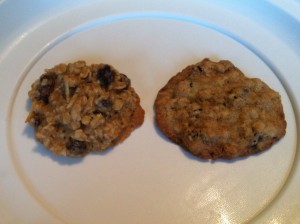
The recipes couldn’t be any more different from eachother but in terms of a winner, I am at a loss. At first I thought it was the one with the coconut (left cookie). Then I thought it was the other cookie. They both have different qualities to them which make them appealing in different ways. The one with the coconut is much hardier and has a nice texture. It is sweet and a has a slight spice to it. The other cookie has much more spice and a bit more sweetness to give it a very well-rounded flavor. After asking numerous people, it is a tie. When the person who loves these cookies was asked, she picked the coconut one. Take your pick.

…from Martha                                                   …from Better Homes and Gardens

Oven: 325F                                                      Oven: 375F

1 1/2 C all-purpose flour                                  1 3/4 C all-purpose flour

1 tsp ground cinnamon                                    1/2 tsp ground cinnamon & 1/4 tsp cloves

1 tsp baking soda                                             1 tsp baking powder & 1/4 tsp baking soda

1 tsp salt

1 C sweetened, shredded coconut

1/3 C pure maple syrup*

1 C butter, softened                                           3/4 C butter, softened

1 C packed brown sugar                                   1 C packed brown sugar, 1/2 granulated sugar

1 egg                                                                  2 eggs

2 tsp vanilla                                                        1 tsp vanilla

3 C old-fashioned rolled oats                             2 C rolled oats

1 C raisins                                                          1 C raisins

*Martha says to use a grade B syrup instead of a grade A, as it has a deeper flavor. I just used what I had in my pantry.

Either way, Enjoy these Oatmeal Raisin cookies (if you like raisins in your cookies that is, I have always preferred chocolate instead)


Pumpkin Bread Revisited

After my last post on pumpkin bread I received a question from a dear friend asking if I wanted another recipe. Of course I said. She then proceeded to send me two recipes. If you don’t know, this friend is Emiglia. We met in France while studying abroad. We managed to become friends (and stay friends) even though we rarely see each other. More on that later perhaps. For now, more pumpkin bread.

She sent me a pumpkin bread recipe that called for dark chocolate chunks in it and one with a cream cheese topping. My other two breads that I had previously made were just classic, plain pumpkin breads. These are embellished, but by no means any more difficult to prepare. In fact, quite the opposite. These are much easier to prepare than my other recipes as you only need one bowl (well you do need a second bowl for the cream cheese topping, but only one for the bread itself) and you do not need a mixer of any sort. Emiglia is very good about keeping quickbreads quick and easy as the name implies.

When my other half came home and saw there was something in the oven, again I had the question, “What’s in the oven?” Again I responded, “Pumpkin bread.” The reply was, “Of course.” I just cannot seem to leave well enough alone. I think I would bake just about anything with pumpkin in it. Anyhow, I tried to explain that these were Emiglia’s recipes and I had to try them. I received an, “Uh Huh.”

Well, the verdict is in. They were both delicious. When it comes down to it, the chocolate chunk bread is the favorite of the two new recipes. It is so moist & filled with pumpkin flavor that is accented by dark chocolate. Need I say more? I urge you all to try them both (see recipes below).


Pumpkin & Chocolate Loaf: http://www.tomatokumato.com/pumpkin-and-chocolate-loaf/

Pumpkin Cream Cheese Quickbread: http://www.tomatokumato.com/pumpkin-cream-cheese-quickbread/

Pumpkin Bread

What’s in the oven? Pumpkin bread.

What’s on the counter? Pumpkin bread.

I received a head nod of acceptance and a simple “ok” for a reply. I bake different recipes for the same item quite frequently in order to try and find the best version. This time it was pumpkin bread. It is September after all.

Once this time of year hits I go pumpkin crazy. I love pumpkin. You tell me it has pumpkin and immediatetly my ears perk up and my stomach gurgles. The only pumpkin item I do not like is pumpkin beer. I’ve tried many and have not liked any of them. Anyhow, I have been making a certain pumpkin bread for years. It is delicious, moist, flavorful, and I have never had any complaints. I happened to come across another pumpkin bread recipe that looked appealing, so I decided to try it out against my go-to bread.

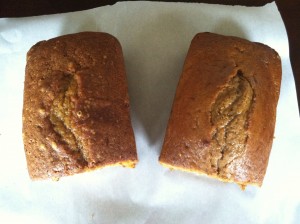
The recipes are completely different from each other but both result in yummy pumpkin bread. I have had numerous people try them and I have an almost tied vote. Some people cannot choose and only two more people has chose my classic pumpkin bread over the newcomer. I honestly don’t know which I like better.

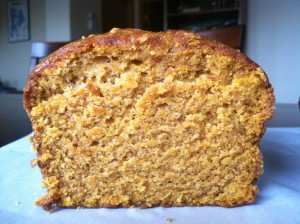
My classic recipe is slightly sweeter and is a bit fluffier. The new recipe is slightly more dense but the spices are a bit more fragrant. The new recipe definitely looks prettier shape wise for breads. All in all, I like them both. Since the person I bake for most often prefers my classic, that is what I will stick with.

IMG_0642 (Both Breads side by side. My classic on the left and the newcomer on the right)IMG_0648IMG_0649

(My classic on the left and the newcomer on the right)

In case you were wondering about recipes, they are as follows.

Pumpkin Bread

…Better Homes and Gardens:                                         …Martha Stewart:

3 cups sugar                                                                    1 cup sugar, 1 cup brown sugar

1 cup cooking oil                                                              1/4 cup vegetable oil

4 eggs                                                                               4 eggs

2/3 cup water                                                                   1 2/3 cup buttermilk

3 1/3 cups all-purpose flour                                             3 cups all-purpose flour

2 tsp baking soda                                                            2 tsp baking soda & 2 tsp baking powder

1.5 tsp salt (I just do 1)                                                    1/4 tsp salt

1 tsp cinnamon                                                                 2.5 tsp cinnamon

1 tsp nutmeg                                                                    1/2 tsp nutmeg

(I add a dash of clove & allspice)                                      1/4 tsp all spice

1 15 oz can pumpkin puree                                               2 cups canned pumpkin puree

For both recipes:

  • two loaves are made. Grease the loaf pans and set aside.
  • Preheat the oven to 350F.
  • Mix dry ingredients in a large bowl and set aside
  • In another large bowl beat sugar and oil and then add eggs

For the Better Homes & Gardens recipe:

At this point…

Alternately add the flour and water beating on low until just combined. When finished, beat in the pumpkin. Spoon into prepared pans. Bake for 55-65 minutes or until a wooden toothpick near the center comes out clean. Cool in pans on wire racks for 10 minutes. Remove from pans. Allow to cool completely. Wrap and store overnight before slicing.

For the Martha Stewart recipe:

At this point:

Add the pumpkin and beat until combined. Alternately add the flour and buttermilk, (ending with the flour) beating on low until just combined. Spoon into prepared pans. Place pans on baking sheet. Bake for 55-60 minutes (rotating pans half-way through) or until a wooden toothpick near the center comes out clean. Cool in pans on wire racks for 10 minutes. Remove from pans. Allow to cool completely.


Enjoy delicious pumpkin bread as a end result!


Chocolate Chip Cookies

Sorry for the delay on all these baking posts but I did not even have a computer until my birthday. Now that I have one, I can publish my few old things that I had stored and move on to new projects. This one is on chocolate chip cookies.

Can you believe that in 28 years of my life I had never made chocolate chip cookies? I had never really made cookies except for around Christmas time as I got older. I’ve been making quite a few cookies lately since I got a Martha Stewart cookbook from a book sale. Side note, I love book sales.

Anywho, I had a request for chocolate chip cookies. I looked to Better Homes & Gardens and I looked to Martha Stewart for help. Their recipes were different of course so I decided to make them and see which would be my go to chocolate chip cookie.

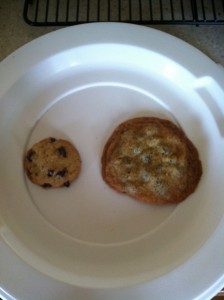
One can look at the recipes to see the differences. The Better Homes recipe uses shortening which I think hinders it being moist or crisp, it was in-between. Martha’s cookie uses more butter and less brown sugar to produce a thin and crisp cookie.

The end result was quite pleasing. They both tasted delicious in different ways. The Better Homes cookie had that classic chocolate chip cookie taste. It wasn’t soft but wasn’t crisp.  It is a good recipe for a reason, but not good enough. The Martha cookie tasted more like brown sugar, more molasses like, even though it has less brown sugar. The Martha cookie won this contest for it tasted delicious right out of the oven, cooled and crisp, and even over the next week.

Better Homes and Gardens Recipe:

Prep: 25 minutes  Bake: 8 minutes per batch

Oven: 375F  Makes: about 60 cookies

1/2 cup shortening

1/2 cup butter, softened

1 cup packed brown sugar

1/2 cup granulated sugar

1/2 teaspoon baking soda

2 eggs

1 teaspoon vanilla

2.5 cups all-purpose flour

1 12oz pkg (2 cups) semisweet chocolate pieces

1.5 cups chopped walnuts or pecans (optional)

1. In a large mixing bowl beat shortening and butter with an electric mixer on medium to high speed for 30 seconds. Add brown sugar, granulated sugar, and baking soda. Beat until mixture is combined, scraping sides of bowl occasionally. Beat in eggs and vanilla until combined. Beat in as much of the flour as you can with the mixer. Stir in any remaining flour. Stir in chocolate pieces and, if desired, nuts.

2. Drop dough by rounded teaspoons 2 inches apart onto an ungreased cookie sheet. Bake in a 375F oven for 8-10 minutes or until edges are lightly browned. Transfer to a cookie rack and let cool.

Martha Stewart Recipe:

2 cups all-purpose flour

1 teaspoon baking soda

1 teaspoon salt

2 sticks (1 cup) unsalted butter, room temperature

1 cup granulated sugar

1/2 cup packed brown sugar

2 teaspoons vanilla extract

1 large egg, plus 1 large egg white

12oz semisweet chocolate chunks (about 2 cups)

1. Preheat the oven to 375F, with racks in the upper and lower thirds. Line two large baking sheets with parchment paper; set aside. In a medium bowl, whisk together the flour, baking soda, and salt; set aside. Beat the butter and both sugars on medium speed until light and fluffy, about 3 minutes, scraping down the sides of the bowl as needed.

2. Add the vanilla, whole egg, and egg white. Beat on low speed until well combined, scraping down the sides of the bowl as needed, about 1 minute.  Add flour mixture in two batches; mix until just combined. Mix in chocolate.

3. Shape 2 heaping tablespoons of dough at a time into balls and place about 1.5 inches apart on prepared baking sheets. Bake, rotating sheets halfway through, until cookies are golden brown, about 18 minutes. Transfer parchment and cookies to a wire rack to cool completely. Cookies can be kept in an airtight container at room temperature for up to 4 days.

Betty on the right, Martha on the left. Size does not matter but taste does. Martha wins.

Better Homes on the left, Martha on the right. Size does not matter but taste does. Martha wins.

Key Lime Pie

Last summer was incredibly hot for what felt like forever. It was actually one of the hottest summers in history here in MN. Since I am in the mode of perfecting recipes I decided to do a more summery pie. I asked for input and the final verdict was key lime pie. Shoot. I really do not like this pie. I have never had a taste for it and I know that there are key lime snobs out there. However, once I set my mind to do something I do it.
To begin, I started searching the web for key lime recipes since I did not have my cook book handy. (I would have done this anyway to compare recipes). This immediately put me into a panic. There are tons of recipes for key lime pie out there and they are all slightly different. Some with more sweetened condensed milk than others, some with sour cream, some with eggs, some with food coloring. The basic components were the same but I have no idea what to do with this pie. Fruit pies are easy. I’ve done them for years. I can search recipes and pick one out and know what to do to tweak it to make it perfect or just not do it at all based on the componants, but key lime might be my death sentence.
I settled on two recipes. One from pioneer woman and one from allrecipes.com. They were drastically different. The pioneer woman used only one can sweetened condensed milk & egg yolks. She claimed you could use limes if you didn’t have key limes so I decided to try it with limes. The other recipe used two cans sweetened condensed milk and sour cream & I used the key limes for that one. Now when I was squeezing the limes for these recipes I didn’t know how they would taste. The key lime juice was like lime juice on steroids. It was so tart. I don’t know if it is because I live in MN and the key limes are not as fresh but the juice from the key limes compared to the limes might make a difference in the pies.
When it was all said and done. It was actually the allrecipes.com pie that one the contest. The pioneer woman key lime pie was delicious. It was very light and sweet and refreshing. The consistency just wasn’t what one wanted for a key lime pie. The other pie was more tart but not overwhelming. The extra sweetened condensed milk and sour cream was able to counteract the tart key lime juice. The texture of the pie was very nice as well.
I only had one key lime pie snob to test them out on, but he was the only one that mattered since it was his request.

The Perfect Poundcake

Sometimes I like to give myself challenges or tasks in the baking world. I called this my first baking challenge: The Perfect Poundcake. I gave myself the weekend of July 21-22 2012 to complete it. It stemmed from the fact that I had made Ina Garten’s Honey Vanilla Poundcake and it was dry to my dismay although quite flavorful. I know that poundcake tends to be dry when most people make it, but I loved everything that came out of my Barefoot Contessa cookbook, so I decided that I would try to perfect a poundcake.

My plan was to modify Ina’s recipe & try a random recipe off the internet that looked interesting to me. For Ina’s recipe I thought about the dryness aspect. In some of my other bread recipes I use oil instead of butter. I know that this may be frowned upon in some baking circles, but it makes some breads incredibly moist. So I decided to replace half of the butter with oil. I didn’t want to lose the denseness from the butter but I thought that if oil worked in other recipes than maybe it would work here. Friends, it was a failure. Not only was it just as dry, but I had lost some flavor as well. The honey vanilla notes did not come through as strong.

On to the random recipe. This one was intruiguing to me. It used cream, where Ina had no liquid really to speak of, and it started in a cold oven and baked for a longer period of time. The poundcake didn’t look as pretty, but it was just as flavorful and oh so moist.

I know this wasn’t a very difficult baking challenge, but it made me feel successful & happy. Sometimes that is all you need. Also, I should thank those around me who ate lots of poundcake along the way as I was going towards my goal.

Sorry for the lack of recipes, but I don’t have the source from which the random one came so do not feel right publishing it without giving proper credit.