Summer of Rhubarb: Rhubarb Upside-Down Cake

IMG_2413

It’s that time of year again…Summer of Rhubarb time. There is a period of time where you could sit outside and literally watch your rhubarb grow. It happens that quickly. I actually made this last year but never got around to posting it. I was busy planning a wedding and a european honeymoon so I didn’t have much free time or ambition for anything else.

This cake seems ambitious but is really very easy. Every time I go to invert an upside-down cake I am fearful that it won’t come out. That it will remain stuck in the pan and I will have a crumbled cake mess. Every time, however, it slides out beautifully and I have a moment of pure satisfaction & baker’s bliss.

Upside-Down Rhubarb Cake

  • 3 tbsp butter, melted
  • 2/3 cup packed brown sugar
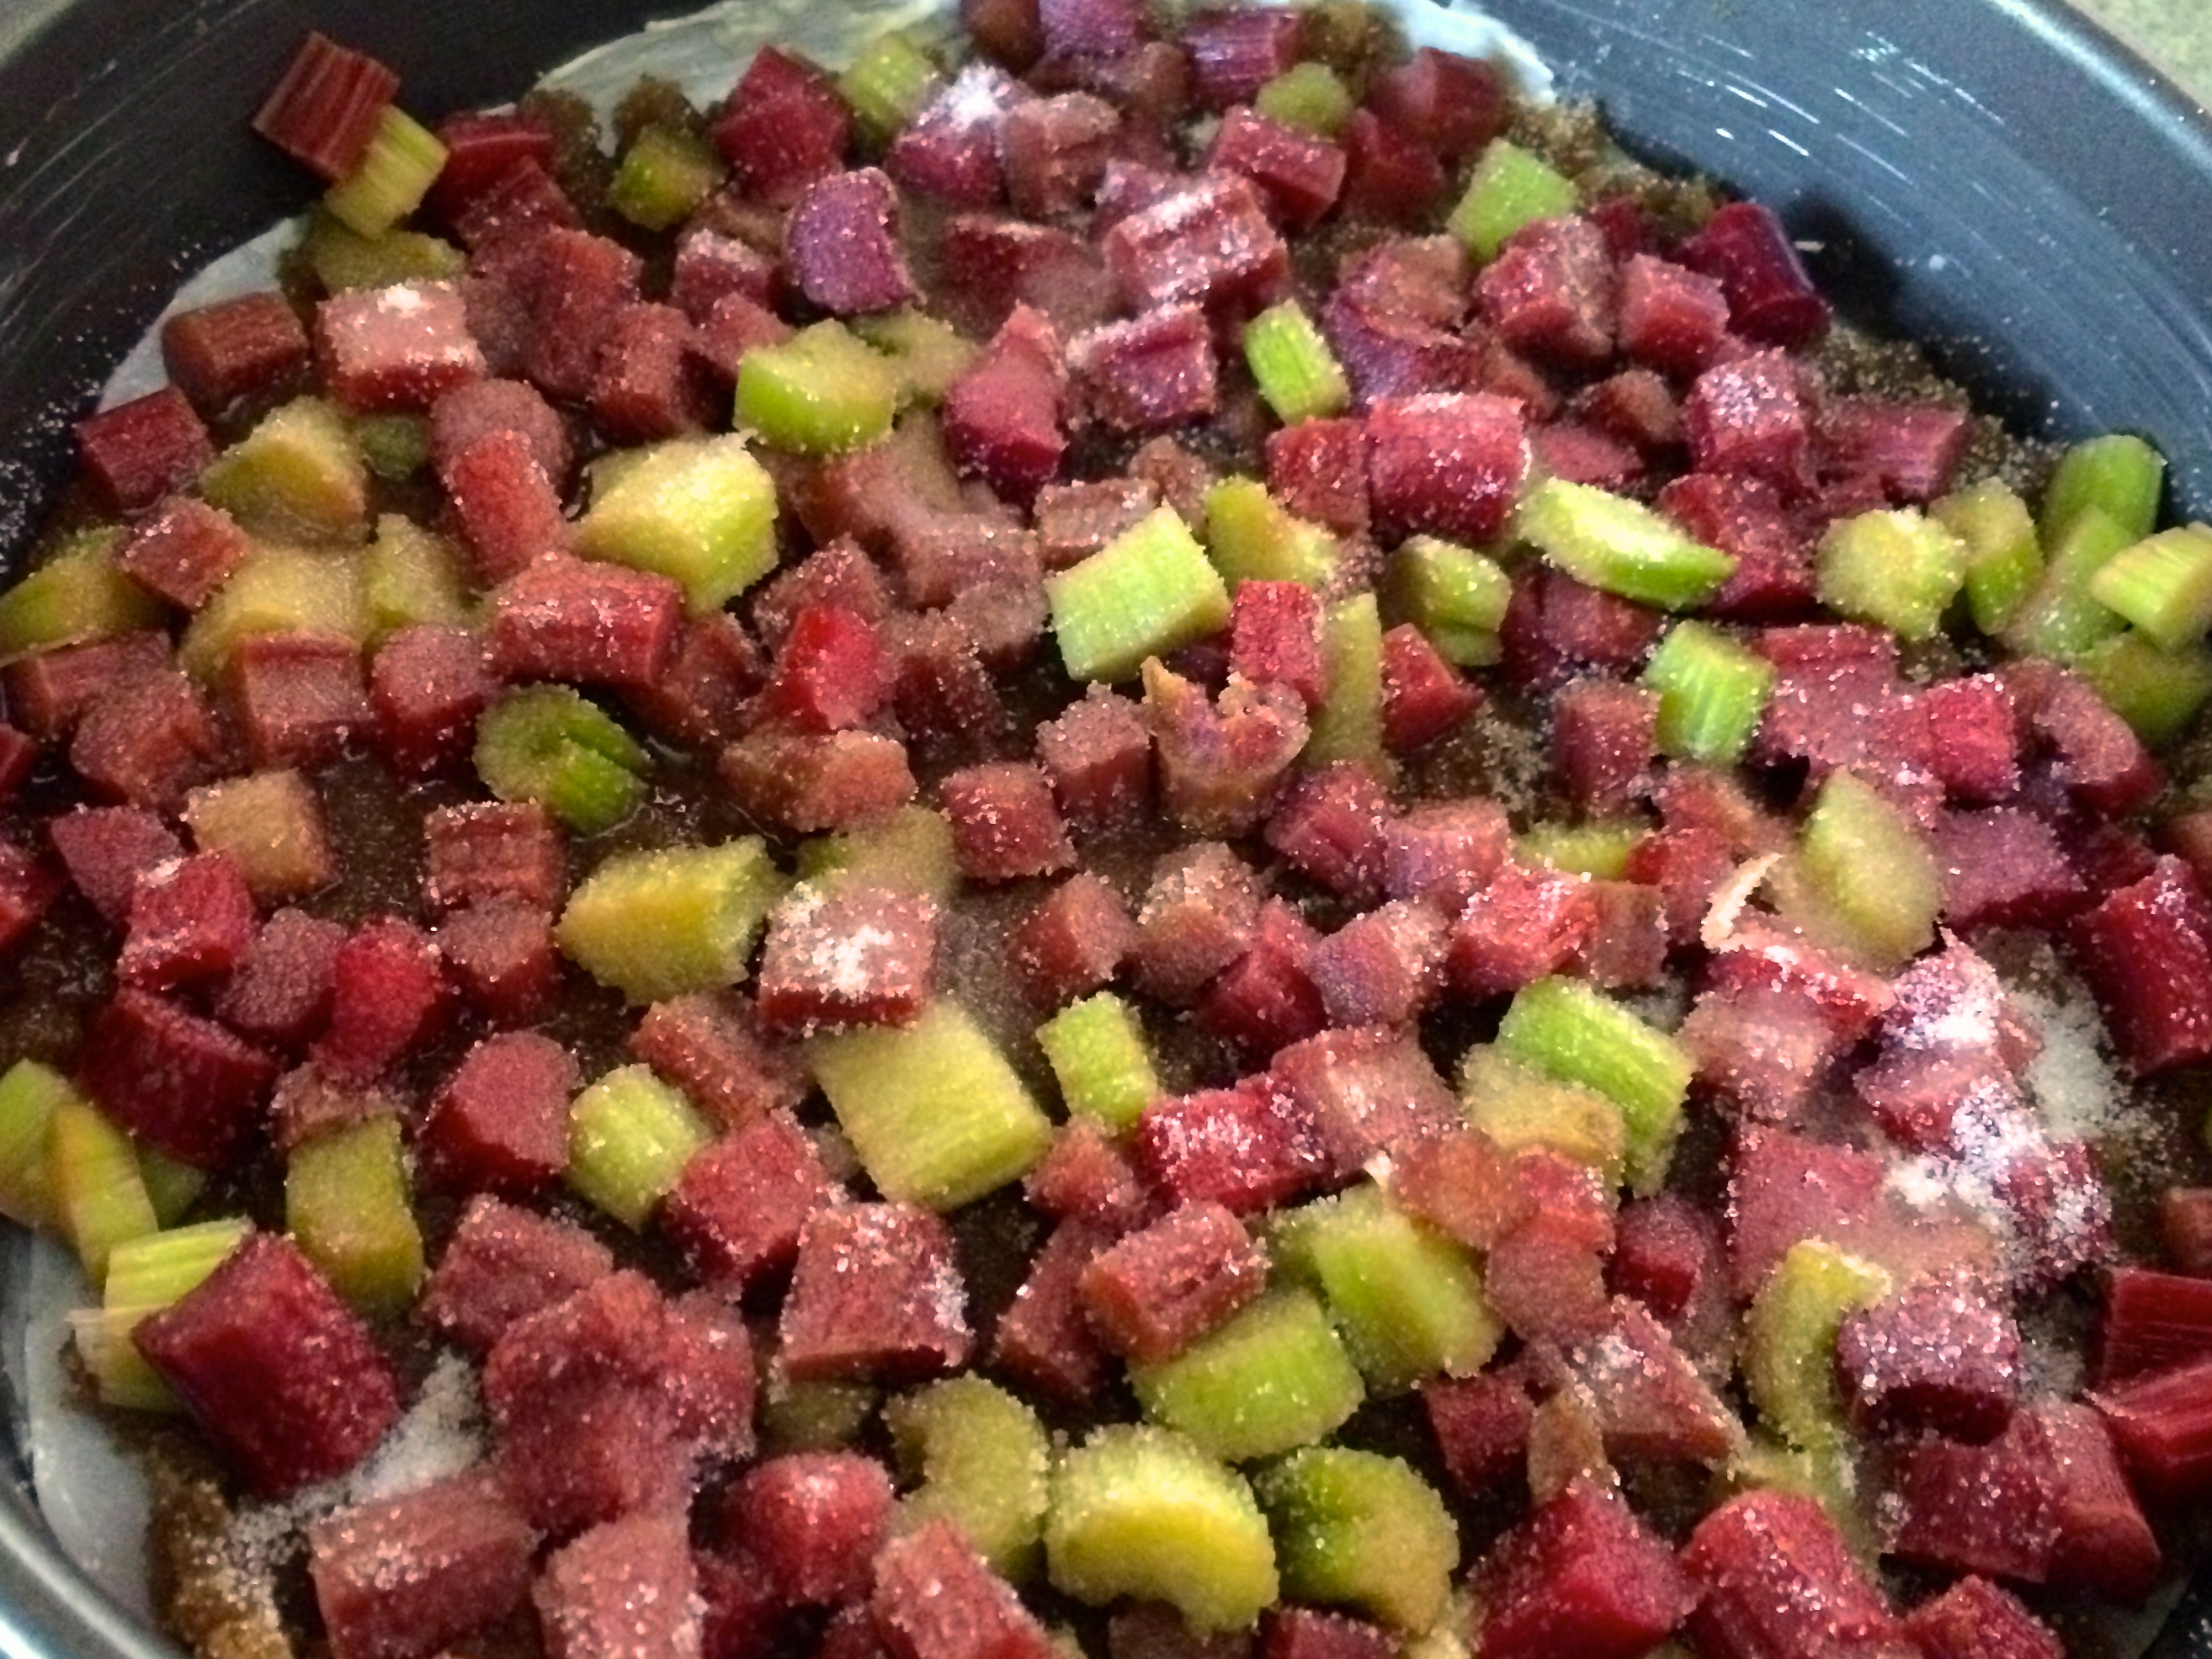
  • 2 1/2 cup fresh or frozen* rhubarb, diced (I used 1 3/4 cup red rhubarb and 3/4 cup green rhubarb)
  • 1.5 tbsp granulated sugar
  • 6 tbsp butter, softened
  • 3/4 cup sugar
  • 1.5 tsp vanilla
  • 2 eggs, separated
  • 1/4 tsp cream of tartar
  • 1 cup flour
  • 1 1/2 tsp baking powder
  • 1/2 tsp salt
  • 1/4 cup milk

*Note that if you are using frozen rhubarb thaw completely first and drain off excess liquid.

Preheat oven to 325F. Grease the bottom and sides of a 9in round cake pan with butter. Line with parchment paper. Grease the parchment paper with butter.

In a small bowl combine the melted butter and brown sugar. Spread over the greased parchment paper. Place rhubarb over sugar mixture. Sprinkles granulated sugar over rhubarb.

IMG_2399

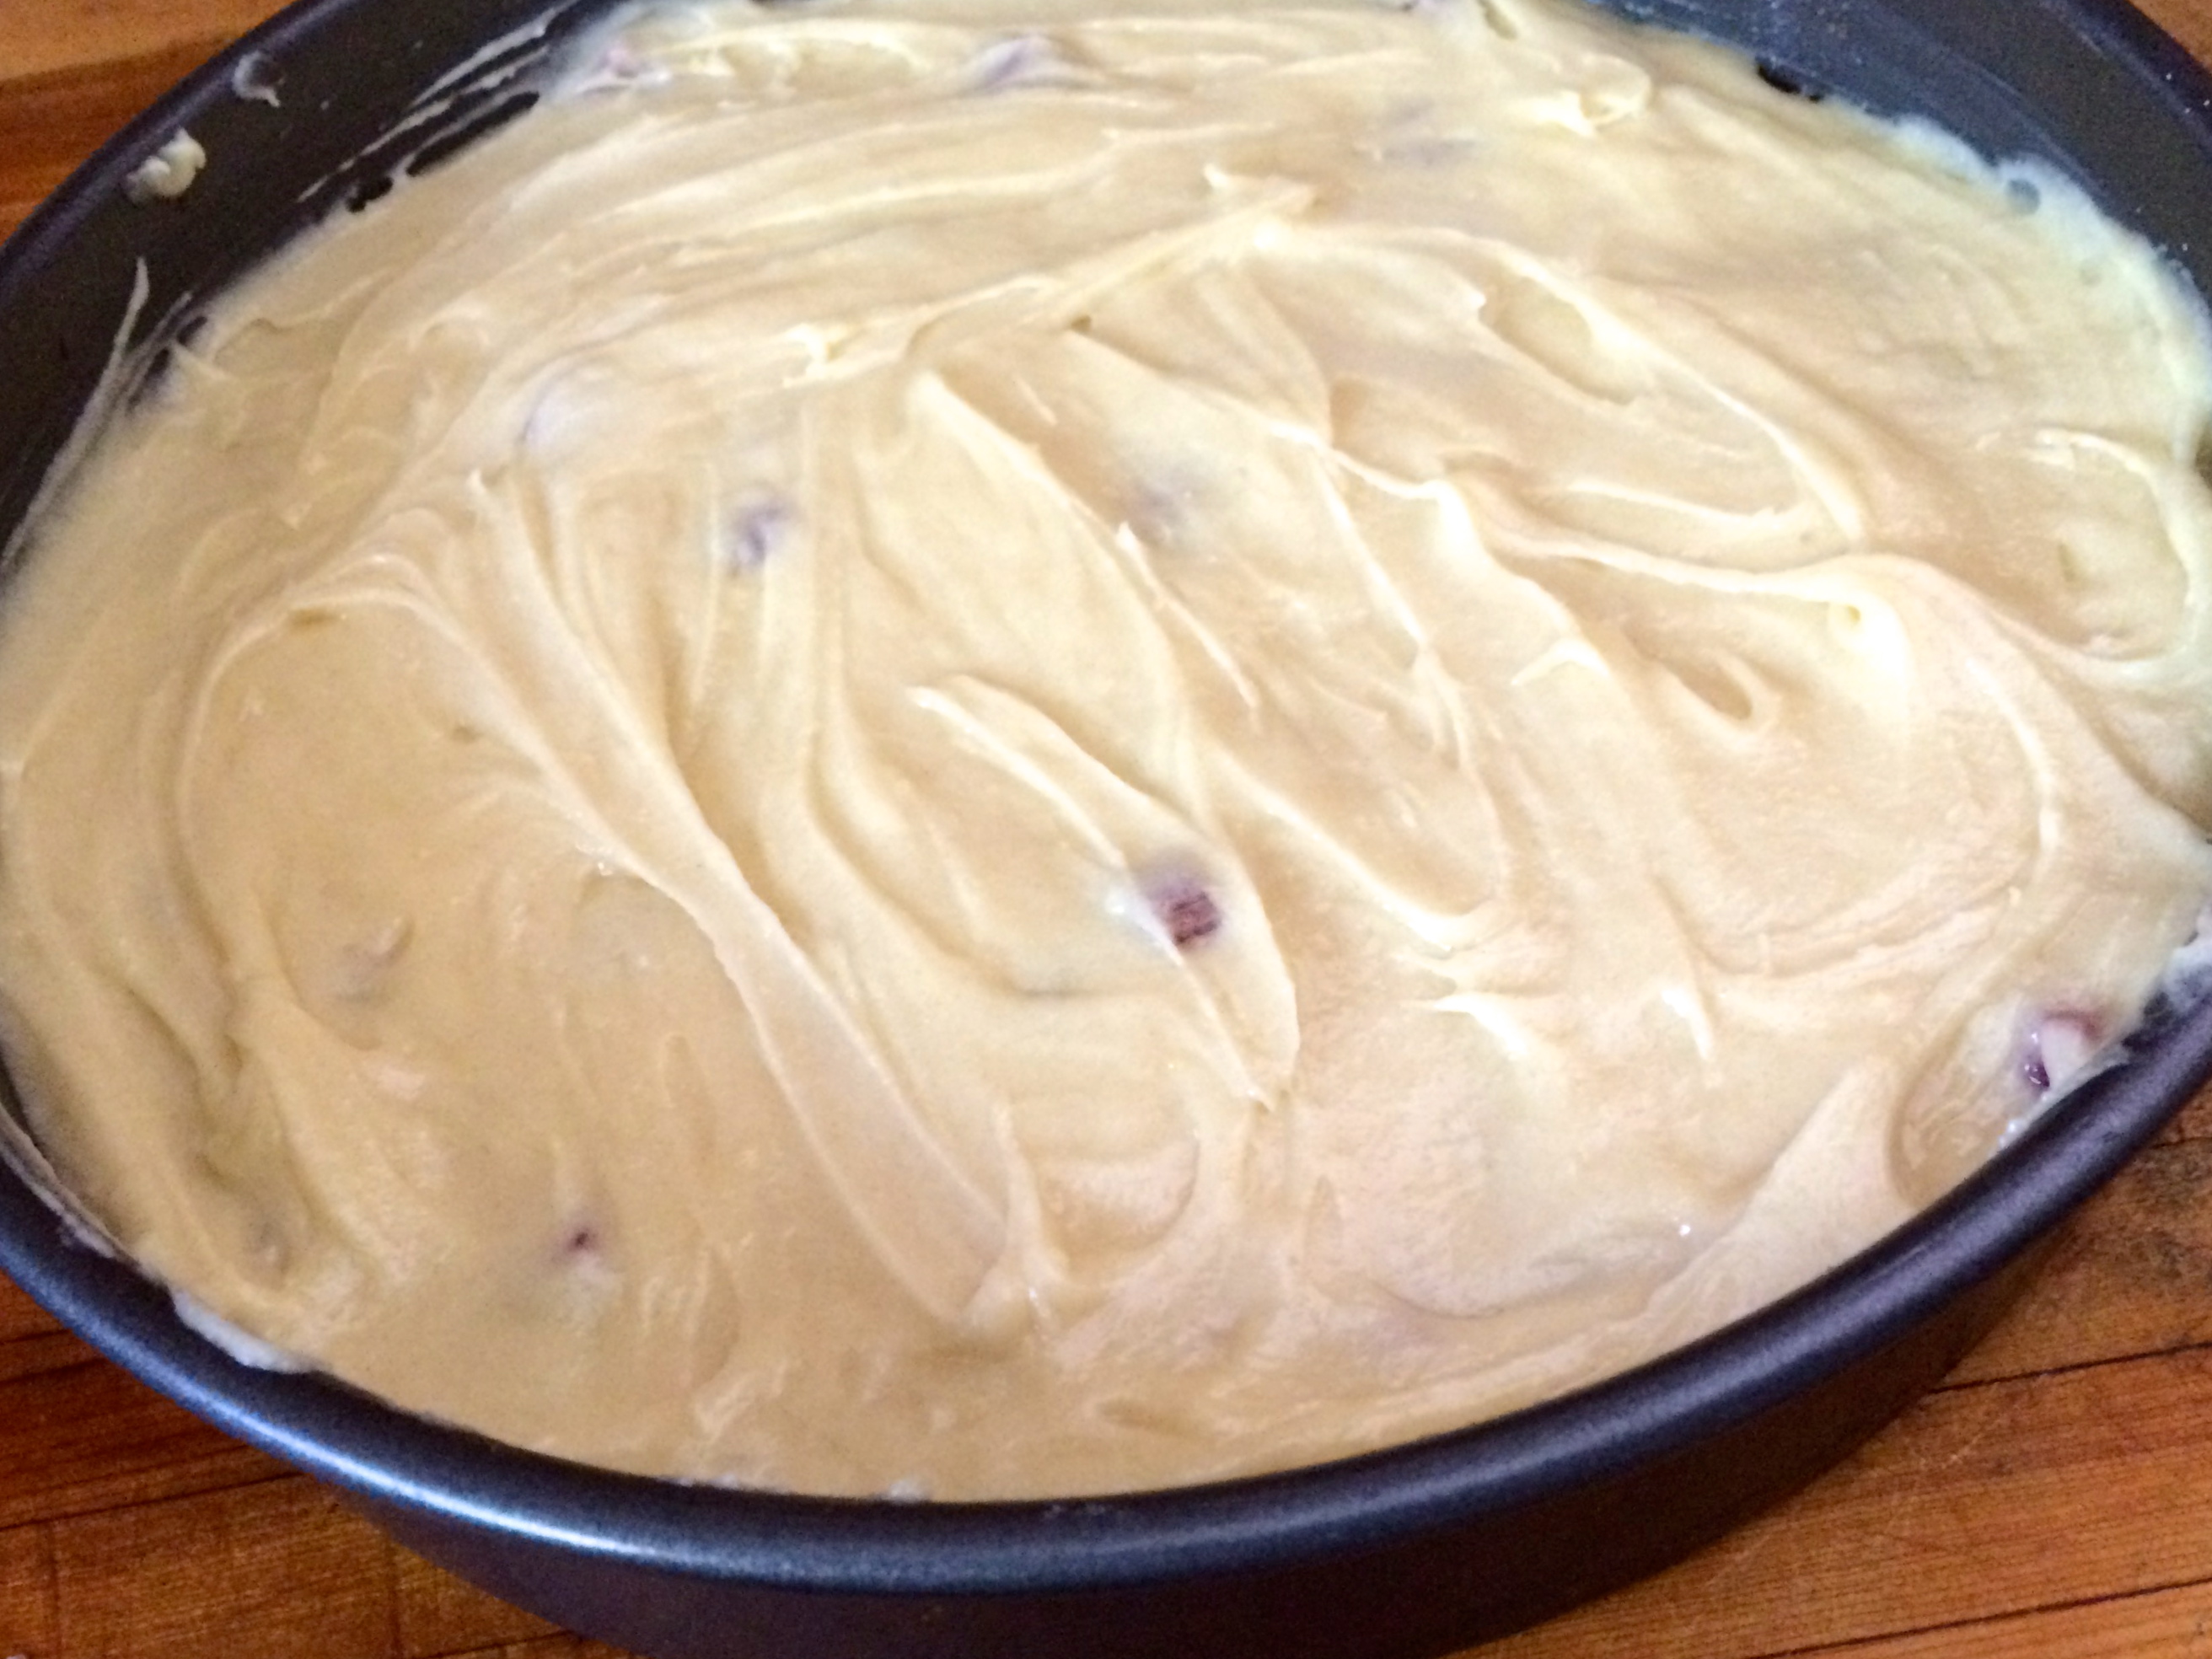
In a medium bowl, cream together the softened butter and sugar. Beat in egg yolks and vanilla. Add the flour, baking powder and salt. Mix until combined. Add the milk. Mix until combined.

In a medium bowl beat egg whites and tartar until stiff peaks form. Fold into the batter gently. Pour over rhubarb.

IMG_2403

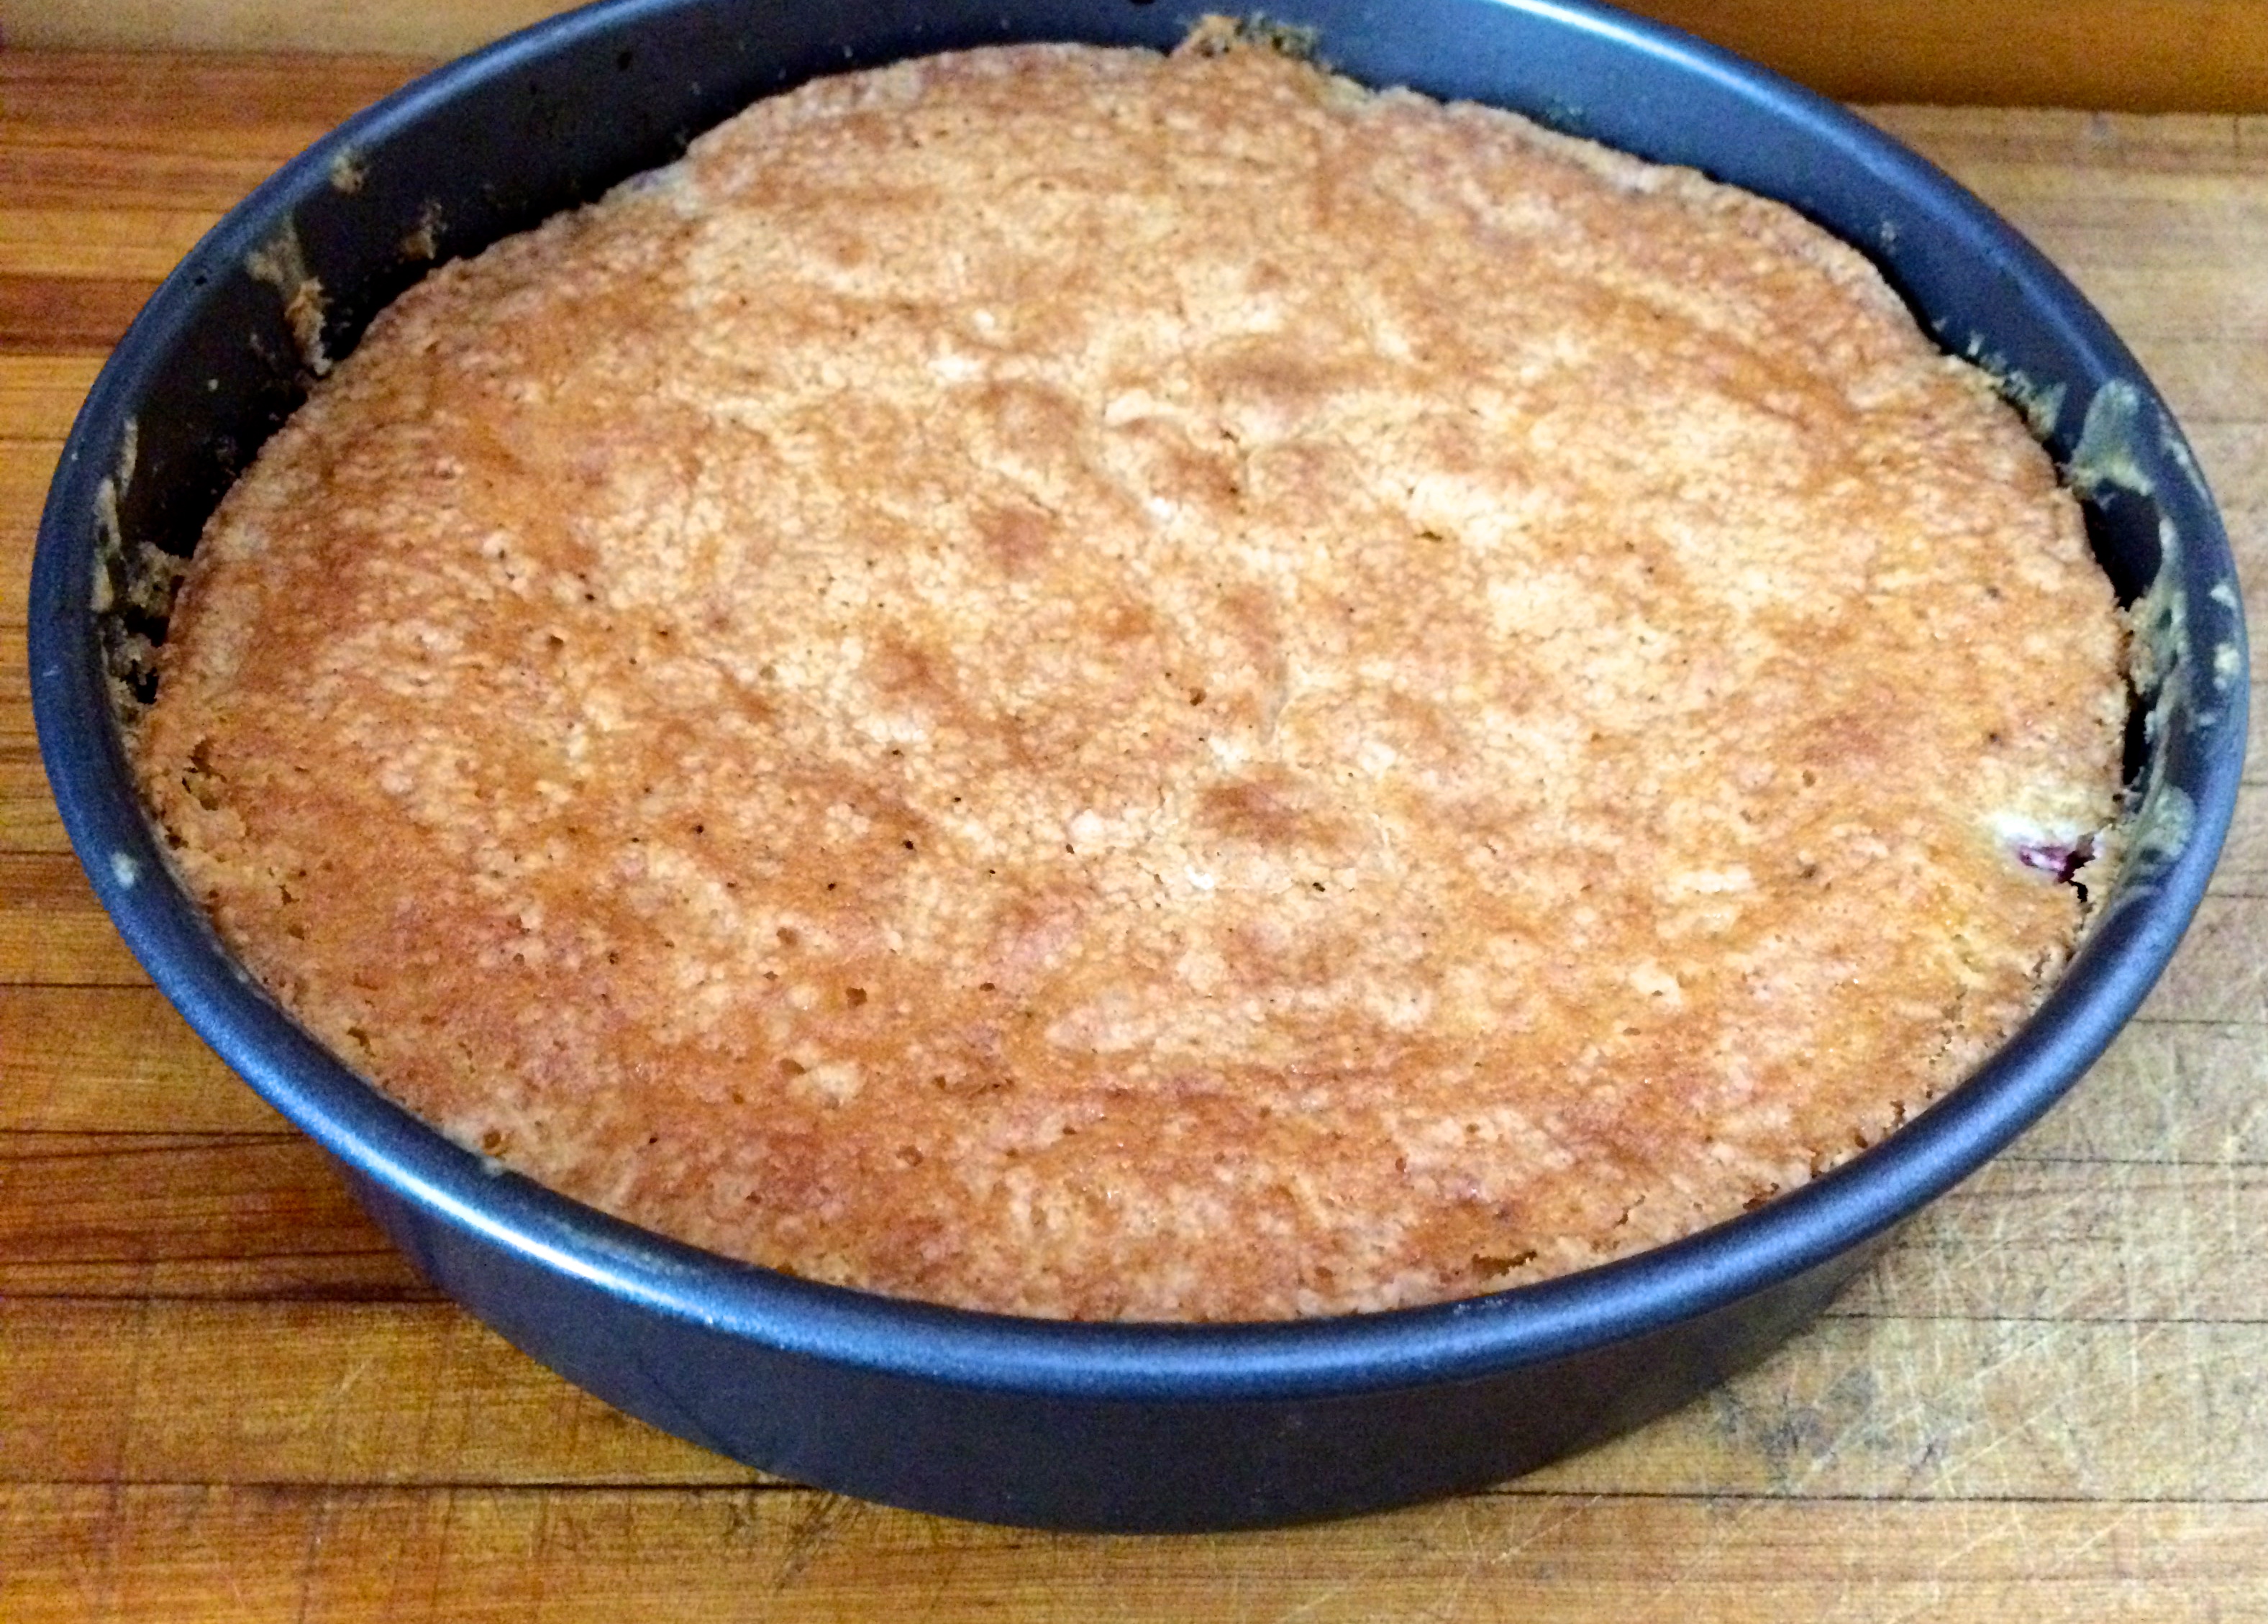
Bake for 55 minutes or until top is golden and lightly springs back when touched or a toothpick inserted comes out clean.
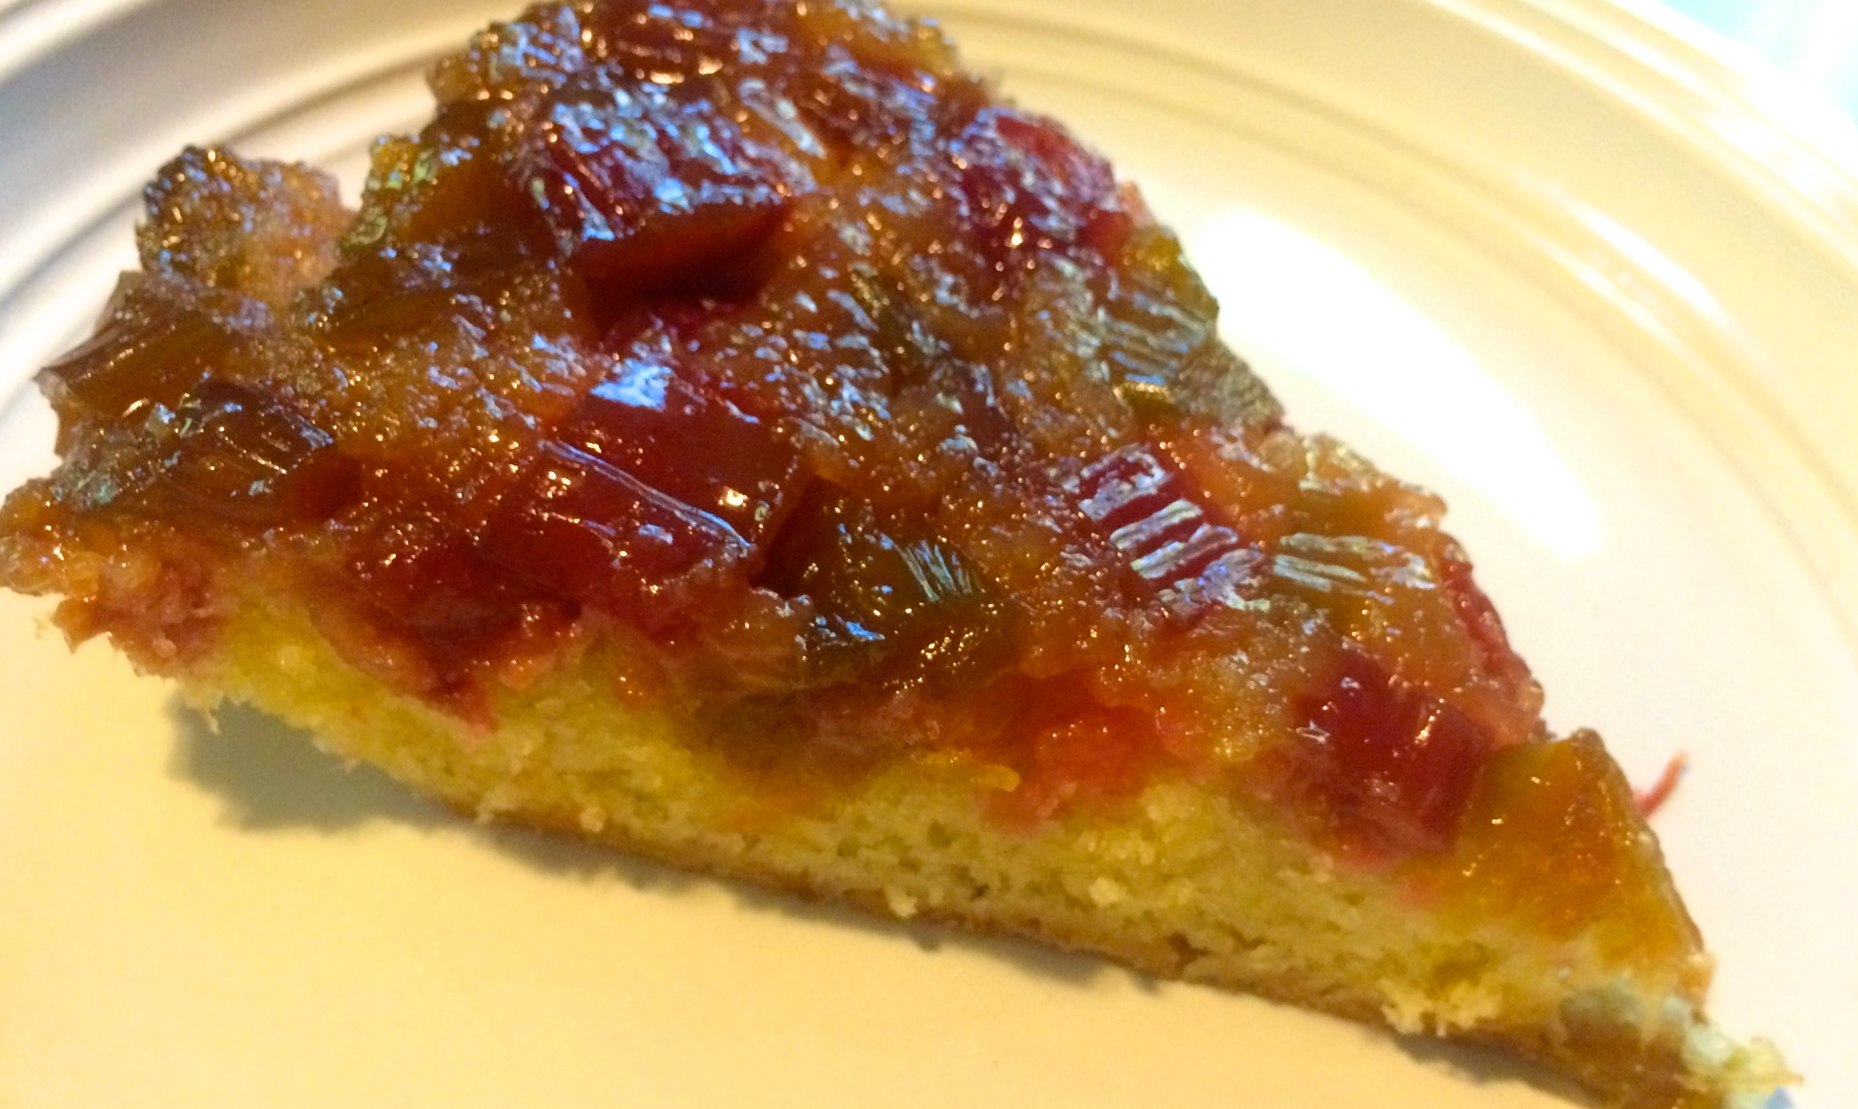
IMG_2406

Invert the cake.

IMG_2410

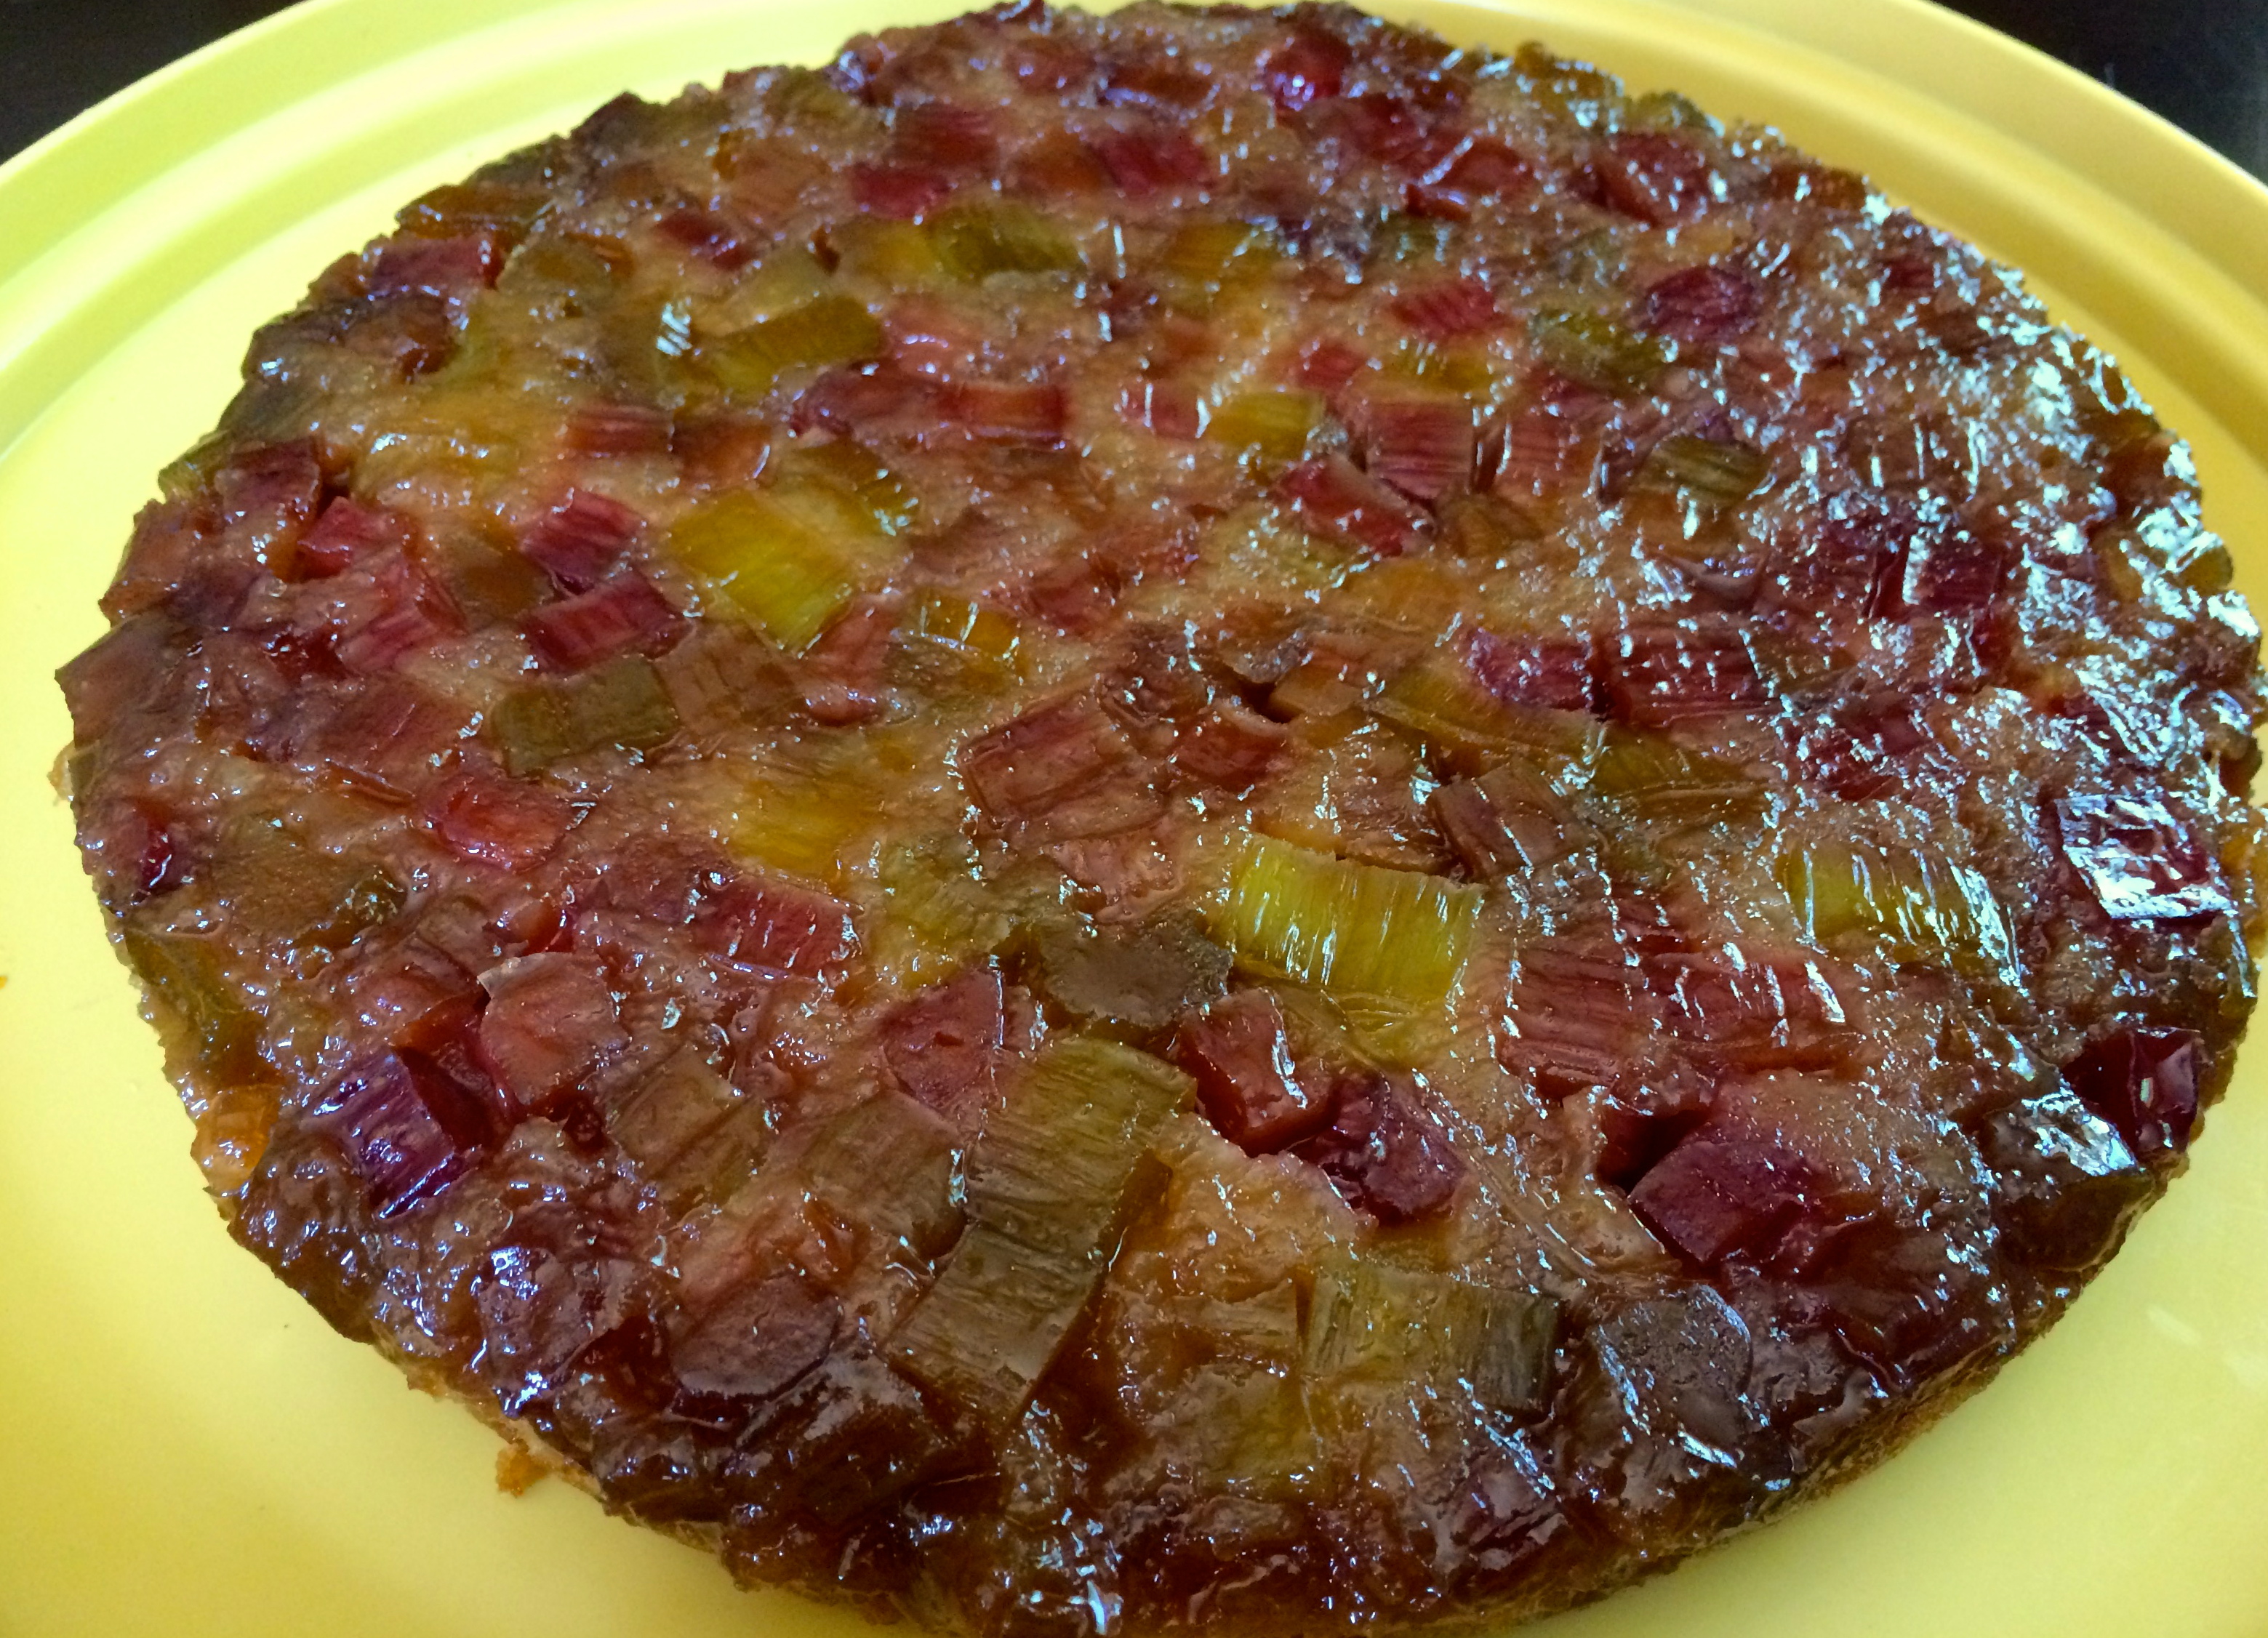
Be proud. Be happy. Serve with whipped cream or ice cream if desired.

IMG_2413

Ground Chicken Enchilada Casserole

IMG_3699

I just got back from a honeymoon in Europe specifically Paris & Barcelona. I had not cooked for 2 whole weeks so wanted to make something easy my first night back home. I knew a casserole was the answer. I know it’s a pretty Minnesotan thing to make and not very fancy for my first night back home but it was quick & easy & delicious.

Seeing as how we hadn’t been home for 2 weeks I didn’t have very much to work with. Besides some whole chickens in the freezer, which would take forever to thaw, I had 1lb of ground chicken. I knew this was what I could work with. Based on my pantry & fridge ingredients I knew that an enchilada casserole was in store.

Casseroles get a lot of grief but they are truly a godsend. Yes, it often looks like dog food. It’s hard to photograph certain casseroles well. Don’t even try. Really. I used corn tortillas as well so nothing holds its shape. You don’t even have to make enchiladas. Just layer the tortillas, add the filling, top with more tortillas, and finally the sauce. It looks a mess but just enjoy the simplicity & the deliciousness of it.


Ground Chicken Enchilada Casserole (serves 4)

  • 1 lb ground chicken
  •  taco seasoning
  • 4oz cream cheese (I used light)
  • 1 can black beans, drained & rinsed
  • 1/2 cup chunky salsa, divided
  • 4oz can diced green chilis
  • 8 corn tortillas, torn into pieces
  • 1 can cream of chicken soup
  • shredded cheddar cheese

Brown the ground chicken and add taco seasoning to taste. Add the cream cheese & stir over low heat until the cheese has melted & is thoroughly mixed with the meat. Add the black beans, 1/4 cup of the salsa, 1/2 of the green chills & stir to combine. I also added a tsp of ghost pepper salsa at this point for some extra heat.

IMG_4366


Mix the can of cream of chicken soup with the rest of the salsa & green chilis. Spread a small amount over the bottom of a casserole dish (I did 2 smaller dishes so we would have another one to bake at a later date). Layer half of the tortillas in the dish (s) and top with the filling. Top with the rest of the tortillas. Finally, spread the sauce over the tortillas. Bake for 40 minutes at 400F and top with shredded cheddar cheese. Bake for 5 more minutes. Serve and enjoy!

IMG_4371

Poutine


IMG_3068


I have never had real Poutine. I don’t know how this is possible considering I live in Minnesota or Almost Canada. I had poutine at the MN State Fair but it wasn’t real Poutine. It was more like a fast food version. This recipe might not be traditional but it is delicious. Maybe one day I will have a traditional version but until I do this will suit me just fine.

Poutine (serves 2)

  • 1-1.5 cups shredded cooked duck
  • 1 cup duck gravy
  • 2 cups diced potatoes
  • 2 tbsp lard
  • salt & pepper to taste
  • shredded swiss cheese

Fry the potatoes in the lard with salt & pepper until crispy. Place in a pie plate.

IMG_3064

Top with shredded duck and then gravy. Bake for 15-20 minutes until duck is heated through. Top with swiss cheese. Bake for 5 minutes more until cheese is melted. Serve & enjoy

IMG_3068

Walleye Cakes & A Poached Egg

This was an exceptionally short ice fishing season. It hasn’t been this short in 28 years for everyone in Almost Canada. For Lake Minnetonka it was the shortest ice out season since 1887. Wow. That is a crazy record. Because of this I didn’t get to go fishing as often as I would have liked. Normally I have to find creative ways to work through all the walleye we catch but not this year. I decided to make walleye cakes with this batch which is one of my favorite ways to eat walleye. I was even adventurous enough to make poached eggs for the first time & was very pleased with the results.

Walleye Cakes (serves 2)

  • ½ vacuum sealed bag walleye (roughly 4 small fillets or 2 medium fillets) previously cooked*
  • 1 egg
  • 2 tbsp Mayonnaise
  • 1-2tsp Lemon juice
  • 1/4-1/3 cup potato flakes
  • Oil
  • 2-4 poached eggs (I just served 1 egg per person but feel free to do more)

*To cook the walleye, place the walleye on a baking sheet lined with foil & spray with cooking spray or lightly coat it in olive oil. Lightly season the fillets on both sides with blackened seasoning or cajun seasoning. Spray fillets with cooking spray or drizzle with olive oil. Bake for 10-15 minutes depending on the size of the fillets until cooked through. Once cooked, place them in a medium mixing bowl in the fridge covered with plastic wrap to be used the next day or shred into chunks to be used immediately.

Cooking the Walleye Cakes: Shred the fillets if needed. Add all the ingredients except for the oil & the eggs that you will poach.

Mix the ingredients & form into patties (makes roughly (6) 2in patties – 3 patties for each person).

Place a small amount of oil in a skillet over medium to medium-high heat & cook the walleye cakes for 2-3 minutes per side until golden brown & heated through. Place on a paper towel to drain off excess oil.

Serve with poached eggs.IMG_2256

Asian Venison & Broccoli

IMG_2956


I harvested my first deer this last deer season. My guide cooked the tenderloin & made chicken fried venison steaks thus far, but one of the reasons I wanted to harvest a deer was to learn how to cook with venison. It’s hard for me to justify hunting unless you have good reasons, i.e. putting food on the table, conservation, using the hide, gaining skills & perspective on life, etc. I don’t understand people who hunt for antlers. Don’t get me wrong, I wouldn’t turn down a nice buck to put on the wall, but that cannot be my only reason to hunt.

One of the times my guide and I went to check out my hunting grounds I brought my shotgun with me to see if I could get some grouse or other small game. My guide said, “There is a squirrel, shoot him.” This is what he saw…

IMG_2879


I, however, saw this…

IMG_2880


Needless to say I didn’t shoot him. I saw a squirrel and he was eating something. He was small. There was not enough meat on him to feed one, let alone two. I looked back at my guide and I said, “He’s eating breakfast.” I kid you not. Hunting happens in split seconds and in that moment I didn’t see something worth shooting. I saw an animal enjoying the morning like my guide and I were doing.

Maybe that is part of the reason why I was able to harvest a deer. Maybe the world smiled upon me for making a good hunting choice on when to shoot. My deer was not so lucky in that aspect. I decided to pull the trigger. Now I have provided my guide and myself with a freezer full of venison.

I decided to cook with one of the choice cuts of meat for my first attempt at cooking venison. It actually turned out really good. I will definitely be making this again in the future.

Asian Venison & Broccoli (serves 2)

  • small amount of sesame & olive oil
  • 1 lb deer steak sliced into thin bite-sized strips or pieces
  • heaping tsp minced garlic
  • 12 oz bag broccoli florets, blanched or lightly steamed.
  • 1/2 cup white rice cooked according to package directions

Marinade

  • 1 tsp corn starch
  • 1 tsp sesame oil
  • 1 tbsp soy sauce
  • 1/8 tsp each onion & garlic powder
  • pinch each salt & pepper

Sauce

  • 1.5 tbsp each hoisin, oyster, & soy sauce
  • 2 tsp rice vinegar
  • 1 tsp each chili sauce & honey
  • 1/4 tsp ground mustard
  • dash or two ground ginger


Add marinade to venison and allow to stand for 15-30 minutes. Meanwhile, mix sauce ingredients together.

Heat a small amount of sesame oil or sesame & olive oil in a skillet (I find too much sesame oil is overwhelming so usually do a blend for stir-fries). Add the marinaded venison and garlic and cook briefly (about 1-2 minutes depending on how thin your pieces are). Add the sauce and allow to come to a boil. Cook for another 2 minutes or so. Stir in the broccoli and serve over rice with additional soy sauce.

IMG_2956

Seafood Chowder

IMG_3014


The ice is late this year. Normally I would already be ice fishing. My guy, who is an ice fishing guide, has not really been working due to el nino. This warm weather is also not so great for our small town here in Almost Canada. Our town makes it’s livelihood on tourists and fishing. With the absence of ice, there is an absence of fishermen. The ice is coming, slowly but surely. It’s just about here. Soon our sleepy little town will be alive with fishermen once again. In the meantime, my guide took me ice fishing on a lake that is shallow enough to freeze. It was slow at first but then it was hot & heavy for about 30 minutes and we ended up catching our limit which is great cause we haven’t had walleye in a little while. I have to get creative with walleye. You can only eat fried fish so often. I decided to make a seafood chowder using our freshly caught walleye and it was superb.

Seafood Chowder (serves 4)

1 yellow onion, diced
1 cup diced carrots
2 potatoes, diced
1/8 tsp each cayenne, paprika, garlic & onion powder
1/4tsp salt plus more to taste
1 tsp thyme
1 tsp oregano
black pepper to taste
8 oz clam juice
8 oz milk
1 can cream of mushroom soup
1 lb Walleye, cut into bite sized pieces (perhaps 3-4 average walleye, I had one vacuumed sealed pack)
Shrimp, peeled & deveined (I used about 15 medium shrimp)
small amount of olive oil


Heat a small amount of olive oil in a large stock pot. Add onion and cook until translucent, about 5-10 minutes. Add potatoes & carrots and continue to cook until potatoes begin to become softened, about 10 minutes.
Add clam juice and bring to a boil. Reduce heat, cover, & simmer for about 20 minutes until vegetables are tender. Add the milk, cream of mushroom, and seasonings. Add water to thin if necessary (1/4-1/2 cup at most). Bring to a boil while stirring. Reduce heat to a simmer. Add the walleye and cook for 6-8 minutes. Add the shrimp and cook for 2 minutes more. Serve with french bread & enjoy.

IMG_3014

Pork & Zucchini Meatballs


IMG_2470


I’ve always been a baker. I started baking brownies after school in fourth grade which may have been a contributing factor to my fourth grade chubbiness. It’s only in the last few years that I have actually started cooking.

I do almost all the cooking in my household. I enjoy it. I like to make dinner and meals for other people. With that comes the task of meal planning. I probably take this way too seriously. I will spend 1-2 hours on Sunday and plan meals out for the week.

I live in Almost Canada where a well stocked pantry & freezer is a way of life. I’m usually cooking for two so coming up with meals that use common ingredients is a necessity. In the summer months that means using the garden’s bounty.

Zucchini is one such ingredient. The little zucchini are great for side dishes or replacing noodles. It’s those big guys that hide in your garden that become breads, cakes, fritters, etc. I decided to use them in a meatball instead of onion to keep them moist. The worst kind of meatball is a dry meatball which is probably the most common problem when it comes to making them. These are divine. I also used homemade tomato sauce which makes any dish that much better.

Pork & Zucchini Meatballs (serves 2)

  • 1/2 pound ground pork
  • 1/2 cup shredded zucchini
  • 1-2 tsp minced garlic
  • 1 egg
  • 1 slice bread, torn into small pieces
  • 1 tsp italian seasoning
  • 1/4 tsp onion powder
  • salt & pepper to taste
  • tomato sauce (store bought or use this recipe Garden Fresh Tomato Sauce)


Preheat oven to 400F. Line a baking sheet with foil or parchment paper. Mix all the ingredients together except for the sauce. Form into meatballs (roughly the size of a golf ball). Place on baking sheet and bake in oven for 8 minutes or so until browned. Place in tomato sauce and cook for at least 20 minutes until cooked through (preferably longer for deeper flavor, turning occasionally). Serve over pasta, or if you are like me, sautéed zucchini.


IMG_2470


Tomato Sauce


IMG_2445


I might have been a little too ambitious when it came time to plant the garden. Last year we had two tomato plants. This year we had 18. Yes 18. This included 6 cherry tomato plants which is way too many cherry tomato plants by the way. Next year we are only doing 2 of that variety – one yellow and one red. We also had 6 Roma tomato plants and 6 early girl tomato plants.

I have been working through my tomatoes like crazy. I have made numerous batches of tomato sauce for various dinners as needed and I have frozen about 10 pints of tomato sauce for the winter months. 10 pints really isn’t that much if you use a pint at a time for recipes. I probably use a pint a week for spaghetti or lasagna so I really only have 10 weeks worth of sauce.

Everyone has their favorite recipe. I always change the amounts of seasoning depending on my mood. The only thing I keep constant, the key ingredient for me for a good tomato sauce, is the bay leaf. This is absolutely essential for all good tomato sauces in my opinion. This is probably because my mother used to make tomato sauce and she used bay leaves in her recipes.

I don’t remember many things she made. This is because she wasn’t the best cook. Sorry mom. She wasn’t terrible but I don’t have any fond memories or favorite dishes she made. The only great thing I remember was her long, slow simmer of tomato sauce with a bay leaf.


Tomato Sauce (serves 2)

If you have dozens of tomatoes to work through feel free to double or quadruple this recipe & freeze it for when your garden is covered in snow.

  • 10-12 ripe tomatoes (I prefer a combination of roma & vine-on)
  • 1 tsp olive oil
  • 1 onion, diced
  • 1-2 tsp garlic, minced
  • salt & pepper, to taste
  • 1-2 tsp italian seasoning
  • 1/4 tsp crushed red pepper or more if desired
  • 1 bay leaf


Score an ‘X’ on the top of each tomato.


IMG_2436

Blanch in boiling water for 30-60seconds until the skins split. Remove from the boiling water and add to an ice bath.

IMG_2437

Remove skins. Remove the core portion on top. Roughly chop the tomatoes if you want it to cook down more quickly. Otherwise just cut them in half or so if you don’t care how long it takes.

IMG_2439

Saute the onion in olive oil until translucent. Add the garlic and sauté for 2-3 more minutes.

IMG_2438

Add the tomatoes and the seasoning. Simmer, covered, on low for 2 hours. Remove the bay leaf. Leave as is if you like your sauce a bit chunky or puree with an immersion blender.

IMG_2445

The 2015 MN State Fair

IMG_2486

The Minnesota State Fair came and it left. I attended with my fishing guide. It is something we do every year. Every year is almost the same, yet we keep going back. I am not sure how to explain that.

We always eat a corn dog

IMG_2480


Cheese Curds

IMG_2482


Pork Chop on a Stick

IMG_2481


And Ice Cream from the dairy barn (sorry it got half eaten before the photo)

IMG_2494


Normally we try to find new foods at the fair. Generally this has been New Fair Foods for the year. This year we weren’t that impressed. Instead we decided to just try some things we don’t normally eat.

We got mini donuts. I haven’t had these in years but they were perfect at 8:30AM for breakfast with a coffee. The sugar was all at the bottom but just give them a shake and they are good to go.

IMG_2476


We also tried an egg roll. It doesn’t look like much but for $2 it is a nice snack.

IMG_2485


Later on we ended up going back to the same place as the egg roll and considered buying chicken on a stick. The guy in front of us heard us and turned around. He gave us the most serious look and said, “you better do it.” The tone in his voice was grave. If we didn’t get this chicken than surely there would be hell to pay. We did and it was one of my new favorite foods! I am looking forward to eating it again next year.

IMG_2492


We also walk around the same places. We look at the same things: ice castles, snowmobiles and ATVs, crafts, baked goods (I almost always buy some local honey which I did this year), and the animals. No birds this year due to the bird flu. We also people watch. There are so many “interesting” people at the fair.

We always end up at the craft beer flights.

IMG_2484

They have tables outside and you usually end up sharing a table with others. We were able to get a table for just us initially but then two couples that were there together asked if they could join. We of course said yes. Then the state fair craft beer conversation starts.

Where are you from? What do you do? Everyone is always amazed we live in Almost Canada. The people you encounter at the craft beer area are different yet the same. Many are pretentious (if you do not mind my quick judgement) and many are weird.

I’m sure they think various things about us, but it doesn’t matter. It’s fun. It’s interesting. It’s always an experience at the craft beer booth. You never know where the conversation is going to go. It’s like going to the bar but better because it’s at the fair.

Seeing those two couples together at the fair made me reminisce of years past. It goes without saying that my fishing guide and I haven’t always been together. We have known each other since high school but only in the past few years did we end up together.

Before we were a couple, we were in relationships with other people but friends. Couple friends like these two couples we saw at the fair. We actually used to go to the fair together as couple friends.

Those days seem so long ago. I’m not saying I want those days back but seeing those couples together just reminded me of where I was and where I am now. It makes me wonder where I will be in the future. How will I be different? What will next year bring?

Almost certainly the next year will bring the Minnesota State Fair. If for some reason we don’t end up going it doesn’t really matter. I know it will always be there for us. It is full of fun, food, activities, and memories. Old ones, but more importantly, making new ones.

Spicy Pickled Green Beans

IMG_2376

This is my second summer in Almost Canada. My first summer I was able to have a very small garden. This year it has quadrupled in size. I ended up planting green beans & wax beans where my garden was located last year.

IMG_2363

Right now I am trying to deal with a surplus of beans.

IMG_2366

I have eaten them raw, roasted, blanched for salads, and even frozen some for later when my garden is covered in snow. I don’t have a pressure canner or cooker so my canning abilities are basically non-existent (at least for low acid foods like green beans). I decided to try and pickle them. They turned out fantastic. These can be eaten a week after processing and have plenty of flavor or should keep for about one year.

While they are delicious plain, they are amazing in a Bloody Mary.

IMG_2417

Spicy Pickled Green Beans (Recipe is for 2 half pint jars or 1 pint sized jar. Adjust as needed)

  • 1/2 pint or pint sized mason jars & lids
  • fresh garden green beans, trimmed & washed
  • 1/2 cup water
  • 1/2 cup white vinegar
  • 1/2 cup apple cider vinegar
  • 1-2 cloves garlic, peeled & lightly smashed
  • 1 bay leaf
  • 1-2 dried hot peppers (chili, serrano, etc)
  • 1/4-1/2 tsp red pepper flakes
  • 1/4-1/2 tsp whole peppercorns
  • 1/2 tsp salt
  • 1 tsp honey

In a large pot bring enough water to cover jars to a boil. Submerge jars and lids in boiling water and boil for 12 minutes to sterilize (keep pot with water for processing later). Remove jars & lids with tongs. Fill jars with green beans that have been trimmed to the size of the jar (leave at least 1/4 inch space to the top of the jar).

Meanwhile, bring all other ingredients to a boil in a medium pot. Reduce heat and simmer for 5-10 minutes. Remove bay leaf. Poor brine (including garlic & peppers) over green beans in jars. Leave 1/4 inch headspace to the top of the jar. Apply lids and wipe rim clean. Screw metal band on tightly.

Place sealed jars back in the pot of boiling water (make sure jars are submerged at least 2 inches but are not covered). Boil for 10 minutes. Remove with tongs and place in a cool & dark place. Once cool, check to make sure all jars have sealed properly*. Open in as little as 5-7 days or jars will keep for about 1 year when properly stored.

*Note that if a jar does not seal correctly place it in the fridge and use within 2-3 weeks.

IMG_2377