Beet & Millet Salad with Goat Cheese

IMG_1100


The one thing I have realized since moving up north to Almost Canada is how much I took for granted the convenience of city life. I didn’t even live in the “city,” I lived 30-60minutes away from many conveniences. I was, however, able to access  what I needed with fairly minimal effort. My fishing guide is now showing signs of annoyances as well. Why is it so hard to get groceries? Why cannot one get CO2 for brewing beer? The list goes on.

Now I drive 2 hrs for many supplies including groceries. I know, I know…I’ve complained a lot about this. This time it is for real though. I cannot find goat cheese even when I do travel for groceries. I love cheese. I love all cheese. I especially love goat cheese. There was (1) 4oz pack and I bought it. I also bought beets.

I cannot remember the first time I had fresh beets. I was always exposed to canned beets & thought them vile. I tried them fresh sometime in my early 20’s & fell in love them. To me they taste kind of like earthy corn. Sweet, earthy, & I don’t know what else. They taste delicious. That’s all that counts.

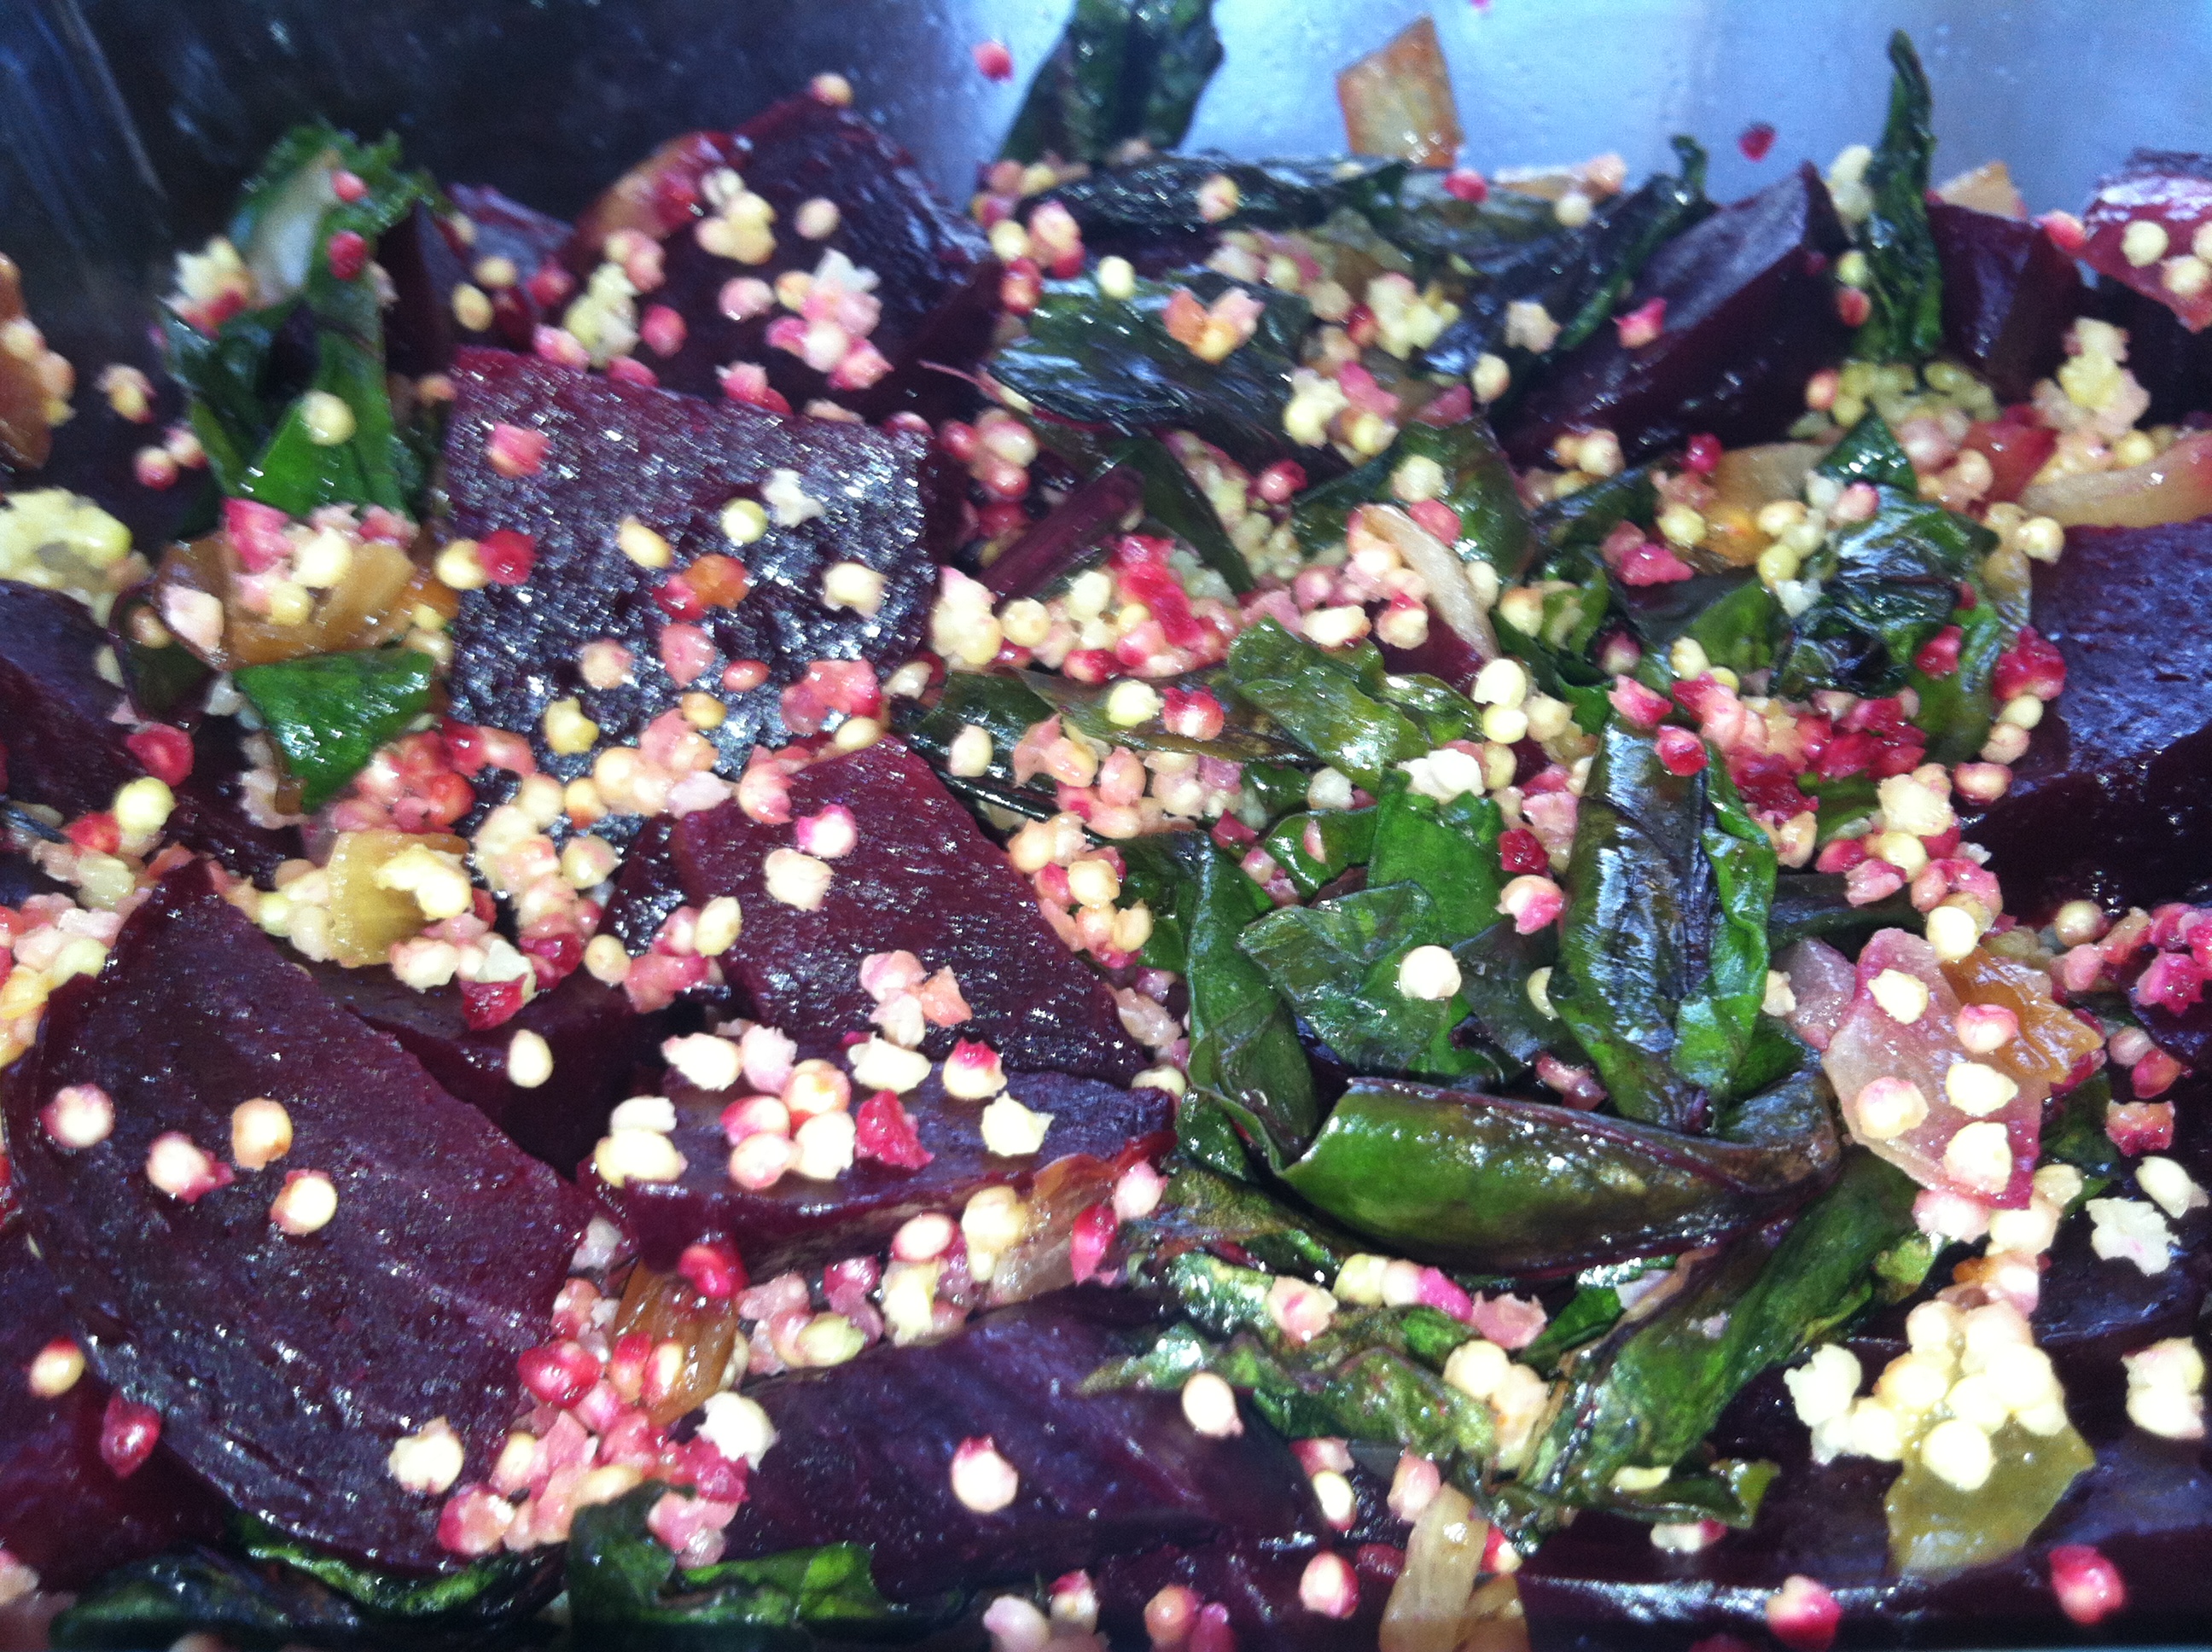
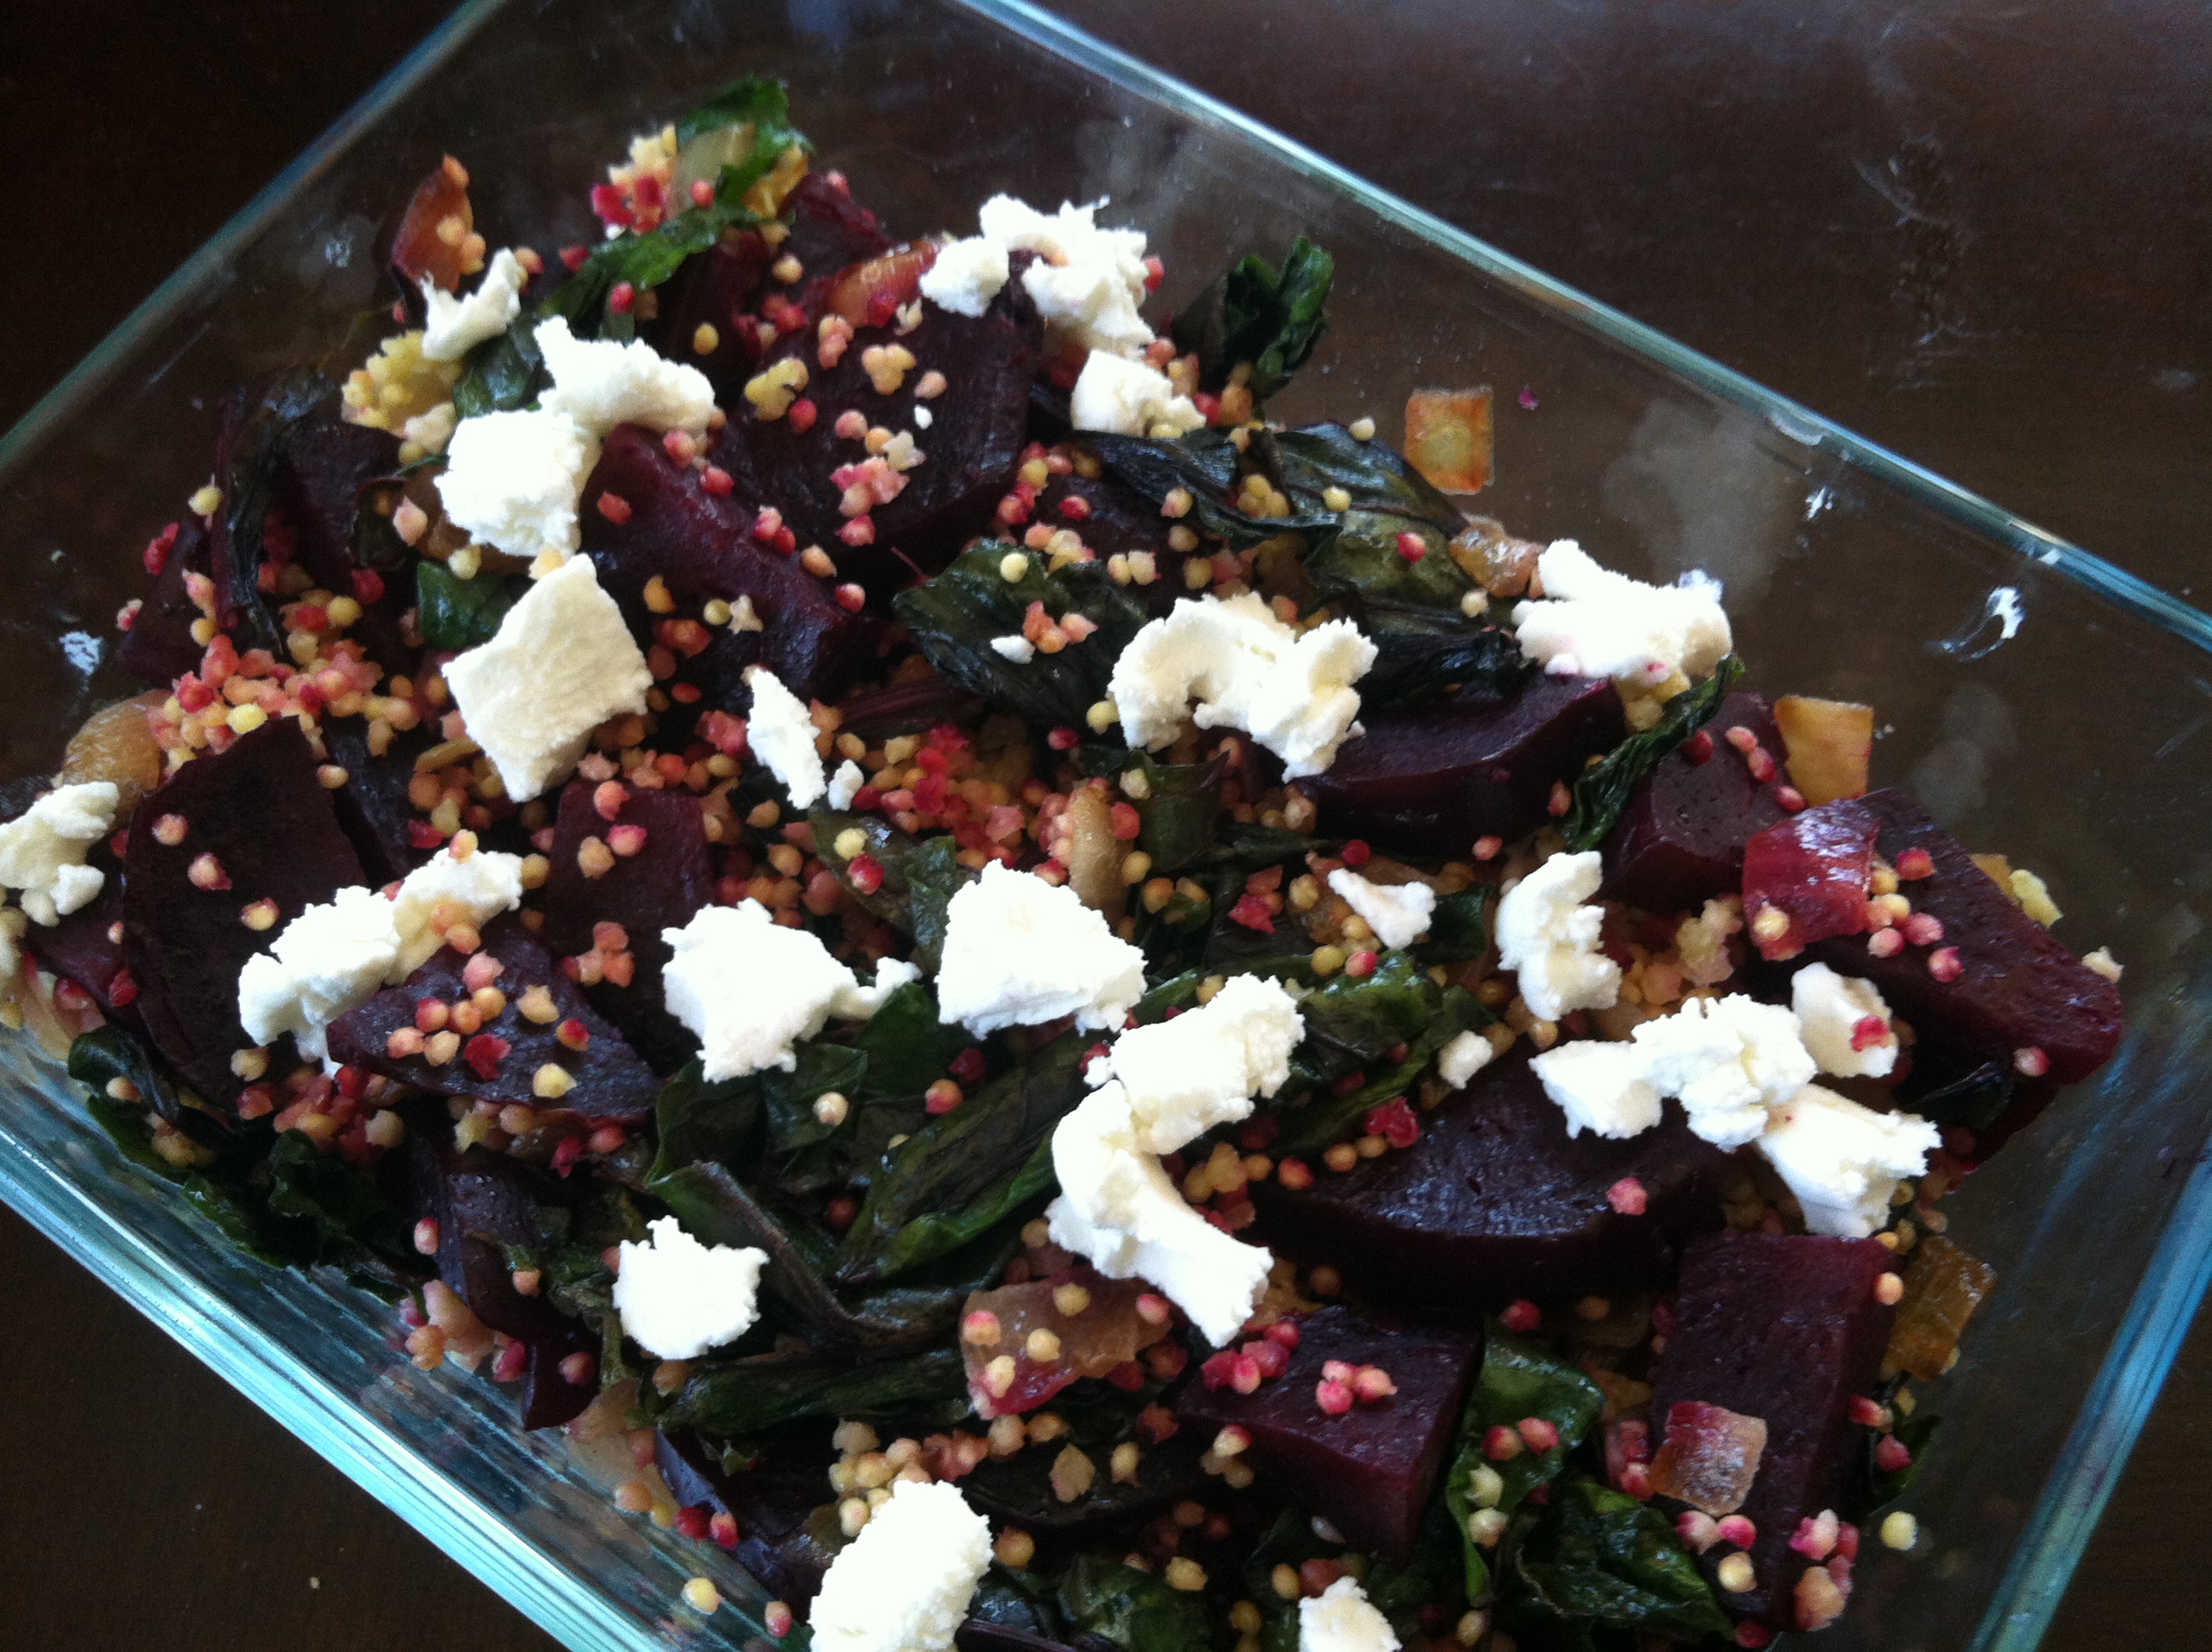
Seeing as how I am the only one to enjoy beets in my household I knew that I could do whatever I wanted with them. I was not going to share any of the goat cheese either. I decided to make a salad with the greens of the beets, a beet, and some millet that I also picked up. It is similar to couscous or quinoa, but tastes a bit like corn, so I thought it would pair perfectly with the beets. Then, I would top it with goat cheese. A shining moment in the annoyances of shopping in Almost Canada.

While I know that these frustrations will be on-going, I also know that it is all worth it. I traded some luxuries & conveniences of life for luxuries & conveniences of another. Small town living has it’s disadvantages, but when I think about where I live and everything it offers, I can accept some grievances I have. I even have a pen on my property so maybe I will raise my own goats and have a constant supply of cheese.

Beet & Millet Salad with Goat Cheese

  • 1 onion, chopped
  • leaves from 1 bunch beets, roughly chopped
  • 1 beet
  • 1/4 millet
  • olive oil
  • rice vinegar
  • 1 oz goat cheese
  1. Chop the top and bottom off of the beet. Wrap the beet in aluminum foil and bake for 60 min in a 400F oven. Let sit in foil until slightly cooled and peel off skin (you can use the foil to scrape it off or run it under cool water and peel it off). Chop into bite-sized chunks.
  2. Meanwhile, cook the millet. Bring to a boil 1/2cup water and add the millet. Cover & reduce heat to simmer for 20 minutes or until water is absorbed.
  3. Saute the onion in a small amount of olive oil until caramelized. Add the beet greens & sauté until wilted. Stir into the cooked millet. Add the beets. Drizzle with olive oil & rice vinegar. Top with goat cheese.

IMG_1107


Chicken or Cheese Rellenos

IMG_1091

Do you have a plan for dinner?

A question that I have become quite familiar with. The answer is yes & no. I am normally the one to make dinners. Every week I take some time to vaguely plan out a dinner menu. I write down a few ideas that I might do throughout the week & cross-check it with my fridge, freezer, & pantry.

As we had just run a commuting errand to get some food items, I knew I had poblano peppers to be used. I also knew I had cheese & salsa in the fridge, green bell peppers & jalapenos in the freezer, and rice, canned tomatoes, & taco seasoning in the pantry.

I said that I would make chile rellenos. I said it would be vegetarian. I received a look of disapproval or skepticism. Maybe a combination of the two. As I was pulling my ingredients together, I noticed that there was a leftover chicken thigh in the fridge. I said I could put in the rellenos & received a nonchalant reply but knew that this would be much preferred.

I decided to make half of the rellenos with chicken & half without. While the chicken had more substance, the cheese variation was much creamier & tasted more rich. They were both delicious & depending on your mood or taste preferences, either will satisfy your needs.

IMG_1093


While these may not be traditional, they are very good.

Chicken or Cheese Rellenos (serves 2)

  • 4 poblano peppers
  • 1 onion, chopped
  • 1 green pepper, chopped
  • 1 jalapeno, diced
  • 1 can diced, stewed, or peeled tomatoes with sauce (if you use whole or stewed tomatoes, give them a rough chop)
  • 1 cup instant rice
  • 1 cup water
  • 2-3 tsp taco seasoning (use prepared or make your own…see below)
  • 1/2 cup reduced fat cheddar cheese
  • 3-4 oz Neufchatel cream cheese
  • pulled or shredded cooked chicken (equivalent to 1 thigh or small breast)
  • salsa
  • sour cream, optional

If you are making your own taco seasoning mix together the following in a small dish…

  • 1 tbsp. chili powder
  • 1 tsp cumin
  • 1 tsp paprika
  • 1/2 tsp salt
  • 1/2 tsp pepper
  • 1/4 tsp garlic powder
  • 1/4 tsp onion powder
  • 1/4 tsp crushed red pepper or cayenne
  • 1/4 tsp oregano
  1.  Place poblano peppers on a cooking sheet & place under broiler. Broil for 3-5 minutes per side until skins are blistered. Place peppers into a bowl & cover with pastic wrap or place in a gallon sized plastic bag. Let sit for 10 minutes & remove skins. Slice open on one side & remove seeds. Add 2 tbsp. cheddar cheese to each pepper. Add 1-2 tbsp. cream cheese. Add salsa as desired. Add pulled chicken to two of the peppers. Close peppers.
  2. Meanwhile, chop the onion, green pepper, & jalapeno. Sauté in a small amount of olive oil over medium heat until caramelized. Add the tomatoes & the water. Bring this to a boil & stir in the rice & taco seasoning. Cover & remove from heat. Let sit for 5-8 minutes until rice absorbs liquid.
  3. Pour rice into a 9×13 in casserole dish. Top with peppers. Bake in a 400F oven for 20-30 minutes until cheese is melted. Serve with additional salsa & sour cream if desired.


Spring or Not Spring


According to the calendar it is currently Spring. For many people in Minnesota it does not feel like spring though. The winter has been long & has rolled into spring like it frequently has in the past. This year as I gaze out into my backyard, this is what spring looks like:

spring


What a beautiful December, I mean March Day. I never understood when people said they loved spring. Spring has always been my least favorite season. Generally, it keeps snowing, or it begins to melt and everything looks gross, brown, grey, and wet.

Spring does mean different produce though. Asparagus in the grocery store means spring has arrived. Asparagus in my grocery store means I hit the jackpot since my store has nothing. I bought the asparagus and decided to use it to make a Chicken, Asparagus, & White Sauce Pizza. No matter what season it is or feels like, this pizza is exquisite.

Pizza Dough from Artisan Bread in Five Minutes a Day (makes 4 1lb dough balls)

  • 2 ¾ cup lukewarm water
  • 1 ½ tbsp granulated  yeast or two packets
  • 1 ½ tbsp kosher salt
  • 1 tbsp sugar
  • ¼ cup olive oil
  • 6 ½ cup unbleached all purpose flour or 6-6 ¼ cup bread flour
  1. Mix all ingredients except the flour.
  2. Add the flour without kneading. Use wet hands to incorporate the last bit of flour.
  3. Cover the container (not airtight) for 2 hrs.
  4. Use immediately or place in the fridge until ready. Use within 12 days.

White Pizza Sauce 

  • 2 tbsp. butter
  • 2 tbsp. flour
  • 1 cup milk
  • dash cayenne
  • dash nutmeg
  • 1/4 cup freshly grated parmesan cheese
  1. Melt butter over medium heat in a skillet
  2. Stir in flour and cook for 1-2 minutes
  3. Stir in milk and whisk until thick & bubbly.
  4. Add seasonings and cheese. Stir until combined.

Chicken & Asparagus Toppings

  • 1-2 chicken breast or 3 thighs cut into 1in pieces
  • 1/2lb bunch asparagus
  • olive oil
  1. In a skillet heat olive oil over medium to medium-high heat.
  2. Add cut-up chicken and sauté until just cooked through. Remove from heat & set aside
  3. Meanwhile, in large pot, bring salted water to a boil.
  4. Chop asparagus into 1in pieces and blanch for a minute.
  5. Drain & run under cool water until the asparagus are cool to the touch

Assembly & Baking

  • 1/4 cup parmesan cheese
  • 1/3 cup mozzarella cheese
  • cornmeal
  • flour
  1. Preheat the oven to 450F with a heat stone inside the oven. Do this 20minutes before baking.
  2. Sprinkle cornmeal on the pizza stone and flour on the counter.
  3. Take a 1lb portion of the dough and place on the floured surface and roll into a circle that is 1/8in thick (or some sort of shape that looks like pizza).
  4. Spread sauce on the surface leaving a 1in border. Place more parmesan cheese on the sauce (roughly 1/4cup).
  5. Top with chicken & asparagus.
  6. Top with mozzarella cheese lightly (roughly 1/3 cup).
  7. Bake for 15-20 minutes until the crust is cooked through & cheese is melted & bubbly.

IMG_1030


Parmesan Encrusted Walleye with Lettuce Risotto

I mentioned previously that I had lots of Walleye in my freezer that needed to be cooked and that I had to get creative with it. I decided that I was going to think of it as any type of fish that I wanted, so that it could be prepared in any way that I wanted. I needed to let go of all my previous thoughts about how to cook walleye. I decided to try and make more of a gourmet dish. I though I would encrust it with parmesan and then make a nice side to accompany it.

Thus, I ended up with Parmesan Encrusted Walleye & Lettuce Risotto. Neither of these things is new, but I have never made either of them. More importantly, I came up with my own recipes for them. Although I am sure they are similar to other recipes out there (as many recipes are similar to one another), at least I can say they are mine.

For the Walleye…

  • Walleye, approximately 4 fillets fresh or thawed if frozen (enough for 2 people)
  • Flour
  • Salt & pepper
  • 1 egg
  • Milk
  • Breadcrumbs, seasoned
  • Parmesan cheese, finely grated (the kind that comes in a “shaky” container)
  • Olive oil

For the Lettuce Risotto…

  • Olive oil
  • 1 onion, chopped
  • 2/3 cup Arborio rice
  • ¼ head iceberg lettuce or 4oz lettuce, chopped
  • 1 cup chicken stock
  • 2.5-3 cups water
  • 1 tbsp butter
  • 2-4 tbsp freshly grated parmesan cheese

Chop the onion and place in a skillet with a few teaspoons of olive oil. Sauté over medium heat until tender and slightly colored.

Meanwhile get two plates and a bowl for the walleye prep. In one plate, place flour and salt & pepper. Gently mix with a fork. In a bowl, beat 1 egg with a little bit of milk. In the last plate, place equal amounts breadcrumbs & parmesan cheese & mix.

After the onion is tender, add the Arborio rice and stir for 2 minutes until toasted, but not browned.

Add ½ cup chicken stock and stir until most of the liquid has been absorbed.

Add the lettuce and sauté until slightly wilted.

Add the rest of the stock and ½ cup water. Stir until most of the liquid has been absorbed and add ½-1 cup water increments until the rice is al dente*. It should be creamy. Stir in the butter and freshly grated parmesan cheese.

*When you have about ½ cup water left to add to the risotto, prep the walleye. Take the walleye and place in the flour mixture, coating both sides, and shake the excess off. Next, place it in the egg & milk mixture. Finally, place it in the breadcrumbs & parmesan cheese mixture.

Place the coated walleye in a skillet with olive oil and cook over medium to medium high heat for about 2 minutes per side until cooked through and golden brown.

Serve the walleye over the risotto and enjoy.

parm walleye